
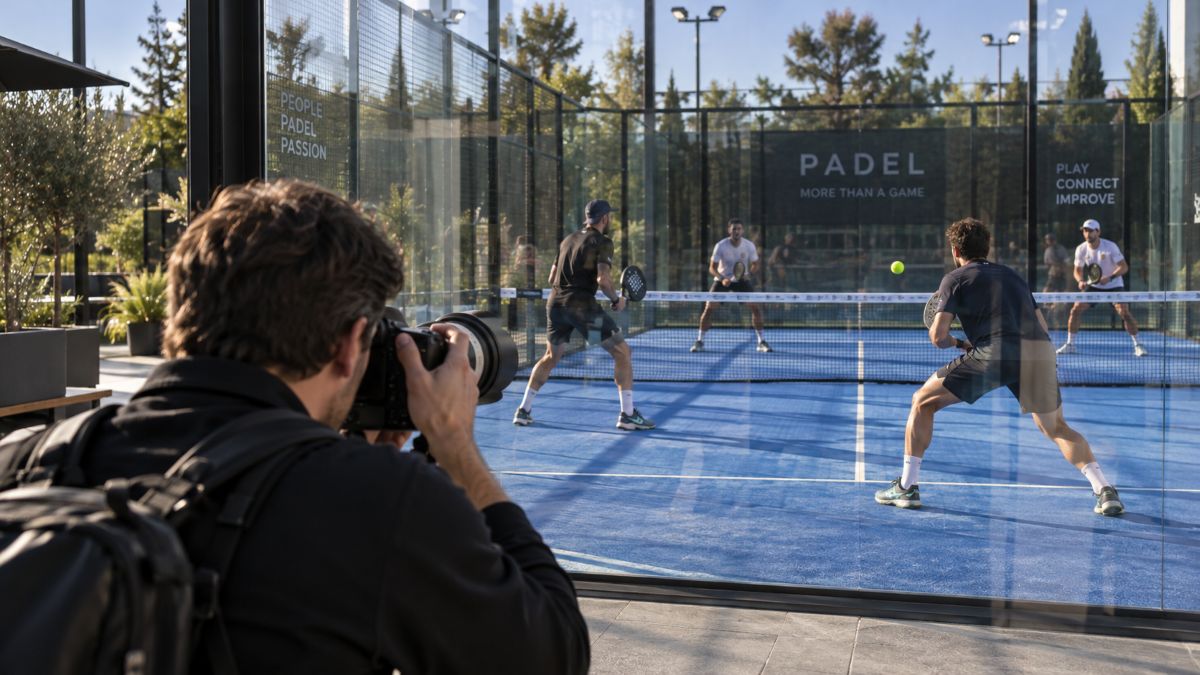
Padel should be a brilliant sport to photograph. Four players share a compact court, rallies move quickly, reactions happen close to the camera, and the glass walls create images you cannot get in tennis or squash. The problem is that the same glass that makes padel visually distinctive also makes it technically awkward.
Shoot from the wrong angle and the glass can fill your frame with reflections, flare, fingerprints, colour casts and ghost images of the photographer. Autofocus may grab the pane instead of the player. A clean rally can become a low-contrast image with a bright reflection across the face.
This guide explains how to photograph padel through glass on a Spanish sports break: where to stand, which settings to start with, how to reduce reflections, when to use a polarising filter, what lenses to pack and how to build a complete travel-and-sport photo story.
Spain is a useful place to practise because padel is widely available across the country. Spain’s official tourism site describes Spain as one of the countries with the most options for playing padel and states that it has more than 17,000 courts, with strong padel destinations including Barcelona, Madrid, Málaga, Marbella, Valencia and Alicante.
If you are still choosing where to shoot, compare destinations by the type of images you want to bring home. Resort locations such as Marbella and the Costa del Sol work well for coastal light, terraces and outdoor courts, while Barcelona, Madrid and Valencia can give you a stronger city-and-sport story. For a practical starting point, you can compare padel holidays in Spain by destination, coaching options, group suitability and travel style.
Quick answer: how do you photograph padel through glass?
Find the cleanest pane, keep the front of the lens close to the glass, block stray light with a lens hood or rubber hood, wear dark clothing, and shoot from shade where possible. Use continuous autofocus, a fast shutter speed and short bursts. Avoid extreme diagonal angles through dirty glass unless the composition is worth the loss of contrast.
A useful daylight starting point is:
- Shutter speed: 1/1000 to 1/2000 second for sharp action
- Aperture: f/2.8 to f/4 for one main player, f/4 to f/5.6 for two players
- ISO: Auto ISO or a manually selected ISO that protects the shutter speed
- Focus: continuous autofocus with a small or medium zone
- Drive mode: high-speed continuous, used in short bursts
- File type: RAW, or RAW and JPEG
These are starting settings, not rules. Adobe’s shutter speed guide explains that fast shutter speeds freeze motion, while slower shutter speeds can show movement. In padel, you will usually secure sharp action first, then experiment with slower panning shots later.
Padel photography settings by situation
| Shooting situation | Starting shutter speed | Starting aperture | Key technique |
|---|---|---|---|
| Bright outdoor court | 1/1000–1/2000 sec | f/2.8–f/5.6 | Protect highlights and watch sky reflections. |
| Cloudy or shaded court | 1/800–1/1600 sec | f/2.8–f/4 | Use Auto ISO and check faces for sharpness. |
| Floodlit evening match | 1/640–1/1000 sec | Widest useful aperture | Test for LED banding and use anti-flicker settings if available. |
| Creative panning shot | 1/30–1/80 sec | Exposure-dependent | Follow the player smoothly through the frame. |
| Portrait through glass | 1/250 sec or faster | f/2–f/4 | Keep the lens close to a clean pane and simplify the background. |
Understand the court before choosing a position
A regulation padel court is a rectangle measuring 10 metres wide by 20 metres long. The International Padel Federation’s Rules of Padel define the court, enclosure, access points, lighting and racket requirements. The court dimensions matter because they shape your lens choice and shooting position.
Padel is usually played as doubles, and the court is surrounded by glass walls, fencing and side access points. The LTA’s beginner padel rules explain the underarm serve, doubles format, walls, cage and basic rally rules.
For photography, the court creates layers:
- The near pane of glass
- The nearest player
- The net
- The opposing pair
- The far wall or fence
- The club, spectators or scenery behind the court
A weak photograph lets those layers compete. A strong photograph uses them deliberately.
Learn the rally before trying to follow it
Good sports photography depends on anticipation. Adobe’s sports photography guidance recommends learning the rules and strategy of the sport because that helps photographers choose where to stand and predict moments before they happen.
The serve
The server stands behind the service line, bounces the ball and serves underarm. Begin the burst as the player drops or bounces the ball, not after you hear contact.
The move to the net
The serving pair will often move forward to attack. From behind the opposite back glass, you can often capture faces, communication and volleys at the net.
The lob and overhead
A defensive lob often sets up an overhead. Watch the player’s preparation: shoulder turn, raised non-racket arm and movement under the ball usually tell you the shot is coming.
The back-glass rebound
This is the shot that makes padel look like padel. The defender lets the ball pass, turns towards the glass and plays it after the rebound. A side or diagonal angle can show player, ball and glass in one frame.
The point after the point
Do not lower the camera when the ball goes dead. Partners touch rackets, laugh, discuss positioning or react to a missed chance. Those frames often say more about a sports holiday than another clean forehand.
Scout the glass before play starts
Arrive early and inspect the court before the main session. You are looking for the pane that gives you the cleanest optical path and the fewest distractions.
- Clean panes with fewer fingerprints and water marks
- Scratches, joins and damaged areas
- Bright signs or white walls behind you
- Reflections from spectators, windows and nearby buildings
- The direction of the sun
- Glass seams and structural supports
- Lighting poles and floodlights
- Elevated viewing areas
Ask the club before cleaning any part of the enclosure. A dry microfibre cloth may be enough to clear a small area directly in front of the lens, but do not use cleaning products or press hard equipment against the glass without permission.
How to reduce reflections in padel glass
Move the lens close to the pane
The simplest reflection-control technique is to reduce the space between the lens and the glass. Place the lens hood close to the pane without pressing a hard hood or front element against it. A flexible rubber hood can create a better light seal.
Wear dark clothing
A white shirt, bright hat or pale camera strap can appear in dark areas of the court. Dark, plain clothing helps the photographer disappear from the reflection.
Shoot from shade
Reflections are harder to control when bright sunlight falls on the photographer’s side of the glass. If you can, work from shade towards a brighter court.
Avoid extreme angles
Shooting diagonally through glass can create strong compositions, but very oblique angles increase the amount of glass the light passes through. Start close to perpendicular, then add angle only when it improves the picture enough to justify the compromise.
Use reflections deliberately
Not every reflection is a mistake. Palm trees, blue sky, a hotel terrace or a watching partner can become a second visual layer. The test is whether the reflection supports the image or covers the player’s face.
Should you use a circular polarising filter?
A circular polarising filter can reduce some reflections from glass, but it is not a magic fix. HOYA explains that a circular polariser can control reflections from surfaces such as glass and that the effect changes as the filter is rotated. HOYA also notes that some polarising filters reduce available light, which matters when you need fast shutter speeds. See HOYA’s guide to how circular polarisers work.
Use a polariser when:
- You are shooting in strong daylight.
- The reflection is clearly damaging the image.
- You can keep the shutter speed fast enough.
- You have time to rotate the filter and test the effect.
Remove it when:
- The court is already dark.
- You need every stop of light.
- The filter has little visible effect from your position.
- The changing angle makes exposure and reflection control inconsistent.
Take comparison frames with and without the filter before the match begins. Do not discover halfway through the session that the polariser has cost you sharpness without meaningfully improving the reflections.
Focus through the glass, not on it
Autofocus can lock onto fingerprints, scratches, reflected spectators or court structure instead of the player. A practical starting setup is:
- Continuous autofocus
- Small or medium focus zone
- Subject or eye detection where reliable
- High-speed continuous shooting
- Back-button focus only if you already use it comfortably
Wide-area tracking can work when the pane is clean, the player is separated from the background and reflections are weak. Use a smaller focus zone when four players overlap, the camera keeps switching faces, the far player is selected instead of the near player, or a reflection confuses tracking.
Some action happens repeatedly in similar locations. Pre-focus or hold a small zone over the service contact area, centre of the net, back-glass defensive zone or usual overhead position.
Best lenses for padel photography
70–200mm: best for action
A 70–200mm zoom is the most versatile action lens from outside the court. It lets you fill the frame with a player at the net, isolate expressions, compress the court and move quickly between full-body and tighter action.
24–70mm: best for context
Use a standard zoom for full-court compositions, group photos, club terraces, players arriving, resort scenes and images that show Spain as well as the sport.
35mm or 50mm prime: best for lifestyle
A fast prime is useful for clubhouse photographs, portraits, equipment details, evening social scenes and shallow-depth-of-field images.
Wide-angle lens: best used sparingly
A wide lens can show the court’s geometry, especially from an elevated position, but it can also exaggerate empty foreground, structural posts and glass distortion.
Best shooting positions around a padel court
1. Directly behind the back glass
This is the cleanest starting position. It gives you faces on the attacking side and a strong sense of court depth.
2. Behind the back-glass corner
This works well for rebounds, diagonal depth and images involving several players. Keep the angle controlled to avoid too much glass distortion.
3. Beside the service area
A side view can capture the low underarm serve, return and partner communication. Watch for fencing, posts and awkward reflections.
4. Elevated above the court
An upper terrace or permitted viewing area can show the full 20m × 10m court, both teams and the surrounding destination. Confirm access rather than climbing on furniture or court structures.
5. Through an open access point
This can give a clean image without glass, but use it only with permission and never block an entrance. FIP rules define access points and safety areas for out-of-court play, so assume the doorway may become part of the rally.
Photographing floodlit and indoor courts
Evening padel can look dramatic because the lit court stands out against darker surroundings. It also creates problems: higher ISO, colour shifts, LED banding, bright lights in frame and reflections behind the photographer.
Before the main session:
- Take a short burst at your intended shutter speed.
- Review several consecutive frames.
- Look for horizontal bands or inconsistent exposure.
- Enable anti-flicker settings if your camera has them.
- Try the mechanical shutter if electronic shutter creates banding.
- Adjust shutter speed if needed.
FIP rules state that artificial light should be uniform and placed so it does not create vision difficulties for players, umpires or spectators. Broadcast-level illumination should not be assumed at an ordinary resort or club court.
How to photograph padel with a phone
A phone can produce strong travel and social images if you work within its limits.
- Clean the phone lens before every session.
- Use the optical telephoto setting where available.
- Avoid heavy digital zoom.
- Tap the player to set focus and exposure.
- Use burst or live-photo mode for action.
- Keep the lens close to the glass and shield it from reflections.
- Avoid portrait mode for unpredictable fast movement.
- Record short video clips of rebounds and rallies.
- Shoot both vertical and horizontal frames.
A phone’s small lens can be easier to shield against glass than a large camera lens. Its main weaknesses are low-light quality, limited shutter control and unreliable subject separation when players overlap.
Build a complete shot list
Do not return with 500 versions of the same forehand. A good Spanish padel story needs action, place, people, details and travel context.
Establishing images
- Full court
- Club exterior
- Hotel or resort connection
- Spanish city, coast or landscape
- Players arriving with rackets
Action images
- Serve
- Volley
- Lob
- Overhead
- Back-glass defence
- Low retrieval
- Partners moving together
Detail images
- Ball against the glass
- Perforated racket face
- Hand on grip
- Court shoes and artificial surface
- Score display
- Water and towel during a break
People and atmosphere
- Partners discussing tactics
- Reaction after a long rally
- Coach giving feedback
- Players meeting local opponents
- Post-match food or drinks
- Group portrait
Ask for access and permission before shooting
Do not assume that booking a padel break gives you permission to photograph every player at the club. Venue permission and permission to publish identifiable photographs are not the same thing.
Before bringing professional equipment, ask:
- Does the club allow photography?
- Can you photograph coaching sessions?
- Are other courts or spectators likely to appear in the background?
- Can images be used editorially, commercially or on social media?
- Are any participants under 18?
- Is a model release required?
- Can you use an elevated terrace?
- Can you photograph through an open access point?
- Is flash prohibited?
- Can you clean a small area of glass?
For a commissioned feature or commercial campaign, record consent and intended image use clearly. Obtain appropriate parental or guardian permission before publishing identifiable photographs of children.
Avoid flash during live play
Flash can reflect strongly from glass and may distract players during a fast rally. Do not use it during live play unless the venue, organiser and participants have approved it.
Adobe notes that flash at indoor sports events should be cleared with officials and used only where it will not distract or affect athletes. With padel’s reflective enclosure and close sightlines, available light is usually the safer and more natural approach.
Flash can still be useful for a controlled portrait after the match, when the photographer and players can choose the angle deliberately.
Choose a Spanish destination that gives you a story
Different Spanish destinations create different photographs. Choose the setting based on the story you want to bring home, not only the number of courts.
| Destination | Best visual angle | Photography note |
|---|---|---|
| Marbella and Costa del Sol | Resort courts, coastal light, terraces and palms | Best at morning and late-afternoon light. |
| Barcelona | Urban sport, beach context and architecture | Good for a wider city-and-padel story. |
| Madrid | Club culture, indoor courts, cafés and city portraits | Useful if you want sport without relying on coastal imagery. |
| Valencia | Mediterranean light, modern city backgrounds and marina context | Good for compact sport-and-city coverage. |
| Mallorca | Island scenery, resort groups, coast and mountains | Strong for a longer travel story beyond the court. |
Edit for clarity without removing the character of the court
Start with technical corrections: white balance, exposure, highlight recovery, colour casts, noise reduction, lens corrections and vertical alignment.
Then work locally. A mask over the player can restore contrast without exaggerating every scratch in the glass. A second mask may reduce a distracting sign or reflection.
Avoid heavy global clarity or dehaze. It can make dirt, fencing, halos and glass texture look worse. Do not remove every sign of the enclosure either. The glass, mesh and reflected light are part of padel’s visual identity.
Camera kit for a three- or four-night padel break
- Main camera body
- Optional backup body
- 70–200mm or equivalent telephoto zoom
- 24–70mm or standard zoom
- Optional fast 35mm or 50mm prime
- Lens hoods
- Flexible rubber hood for shooting through glass
- Circular polarising filter
- Microfibre cloths
- Spare batteries
- Several memory cards
- Chargers and plug adaptor
- Light rain cover
- Portable backup drive or secure cloud workflow
- Dark cloth or jacket for reflection control
A monopod can help with a heavy telephoto lens, but it may be more cumbersome than useful beside a narrow court walkway. Get permission and keep every support clear of entrances.
Simple three-day photography plan
Day 1: scout and establish
- Visit the club before the main session.
- Check access and permission.
- Inspect the glass and lighting.
- Take venue, court and destination photographs.
- Test the polariser and autofocus.
Day 2: photograph the main action
- Begin behind the back glass.
- Secure sharp serve, volley and overhead frames.
- Move to the side for glass rebounds.
- Photograph coaching and player reactions.
- Try creative motion only after covering the essentials.
Day 3: complete the travel story
- Take controlled player portraits.
- Photograph rackets, shoes and court details.
- Capture the group away from the court.
- Add city, beach, hotel or resort context.
- Back up and review the final sequence.
Final padel photography checklist
- Venue and player permission confirmed
- Clean shooting pane selected
- Safe position away from entrances
- Fast enough shutter speed
- Continuous autofocus enabled
- Short-burst drive mode set
- RAW capture selected
- Reflection control tested
- Anti-flicker checked under lights
- Spare battery and memory card ready
- Wide, action, detail and reaction shot list prepared
- Spanish destination context planned
Frequently asked questions
Can you take sharp padel photographs through glass?
Yes. Use the cleanest pane, keep the lens close to the glass, block reflections and focus on the player with continuous autofocus. Avoid heavily angled positions unless they materially improve the composition.
What shutter speed is best for padel?
Around 1/1000 second is a useful daylight starting point. Use faster settings for overheads or frozen ball contact, and slower settings only when you deliberately want motion blur.
Does a polarising filter remove padel-glass reflections?
It can reduce some reflections, but the effect depends on angle and light. It also reduces available light, so test it before relying on it for action.
What lens is best for padel photography?
A 70–200mm zoom is the most versatile action lens from outside the court. A 24–70mm lens is better for full-court, group and destination photographs.
Should you use flash?
Generally not during live play. Flash can reflect from the glass and distract players. Use it only with explicit permission, preferably for controlled portraits after play.
Where should you stand?
Start behind the back glass, then try the back corner and side glass. Elevated viewpoints can show court geometry. Never block a lateral access point.
Can you photograph padel with a phone?
Yes. Clean the lens, use optical zoom where available, place the phone close to the glass, shield reflections and use burst or live-photo mode for action.
Which Spanish destination is best for padel photography?
Marbella and the Costa del Sol work well for resort and coastal imagery. Barcelona and Madrid provide stronger urban stories, while Mallorca combines padel with island scenery.
Final thoughts
Glass is both the problem and the opportunity in padel photography. It can lower contrast, confuse autofocus and fill the frame with unwanted reflections. It can also create depth, symmetry and layered images that make padel look different from every other racket sport.
Control the glass first: use a clean pane, keep the lens close, block stray light and choose your angle carefully. Then let the enclosure become part of the story. Photograph the defender waiting for the rebound, the attacking pair beyond the net, and the Spanish sky reflected faintly across the pane.
The best padel photograph should not simply show a player hitting a ball. It should explain why photographing padel through glass feels different.
- ISO: Auto ISO or a manually selected ISO that protects the shutter speed
- Focus: continuous autofocus with a small or medium zone
- Drive mode: high-speed continuous, used in short bursts
- File type: RAW, or RAW and JPEG
These are starting settings, not rules. Adobe’s shutter speed guide explains that fast shutter speeds freeze motion, while slower shutter speeds can show movement. In padel, you will usually secure sharp action first, then experiment with slower panning shots later.
Padel photography settings by situation
| Shooting situation | Starting shutter speed | Starting aperture | Key technique |
|---|---|---|---|
| Bright outdoor court | 1/1000–1/2000 sec | f/2.8–f/5.6 | Protect highlights and watch sky reflections. |
| Cloudy or shaded court | 1/800–1/1600 sec | f/2.8–f/4 | Use Auto ISO and check faces for sharpness. |
| Floodlit evening match | 1/640–1/1000 sec | Widest useful aperture | Test for LED banding and use anti-flicker settings if available. |
| Creative panning shot | 1/30–1/80 sec | Exposure-dependent | Follow the player smoothly through the frame. |
| Portrait through glass | 1/250 sec or faster | f/2–f/4 | Keep the lens close to a clean pane and simplify the background. |
Understand the court before choosing a position
A regulation padel court is a rectangle measuring 10 metres wide by 20 metres long. The International Padel Federation’s Rules of Padel define the court, enclosure, access points, lighting and racket requirements. The court dimensions matter because they shape your lens choice and shooting position.
Padel is usually played as doubles, and the court is surrounded by glass walls, fencing and side access points. The LTA’s beginner padel rules explain the underarm serve, doubles format, walls, cage and basic rally rules.
For photography, the court creates layers:
- The near pane of glass
- The nearest player
- The net
- The opposing pair
- The far wall or fence
- The club, spectators or scenery behind the court
A weak photograph lets those layers compete. A strong photograph uses them deliberately.
Learn the rally before trying to follow it
Good sports photography depends on anticipation. Adobe’s sports photography guidance recommends learning the rules and strategy of the sport because that helps photographers choose where to stand and predict moments before they happen.
The serve
The server stands behind the service line, bounces the ball and serves underarm. Begin the burst as the player drops or bounces the ball, not after you hear contact.
The move to the net
The serving pair will often move forward to attack. From behind the opposite back glass, you can often capture faces, communication and volleys at the net.
The lob and overhead
A defensive lob often sets up an overhead. Watch the player’s preparation: shoulder turn, raised non-racket arm and movement under the ball usually tell you the shot is coming.
The back-glass rebound
This is the shot that makes padel look like padel. The defender lets the ball pass, turns towards the glass and plays it after the rebound. A side or diagonal angle can show player, ball and glass in one frame.
The point after the point
Do not lower the camera when the ball goes dead. Partners touch rackets, laugh, discuss positioning or react to a missed chance. Those frames often say more about a sports holiday than another clean forehand.
Scout the glass before play starts
Arrive early and inspect the court before the main session. You are looking for the pane that gives you the cleanest optical path and the fewest distractions.
- Clean panes with fewer fingerprints and water marks
- Scratches, joins and damaged areas
- Bright signs or white walls behind you
- Reflections from spectators, windows and nearby buildings
- The direction of the sun
- Glass seams and structural supports
- Lighting poles and floodlights
- Elevated viewing areas
Ask the club before cleaning any part of the enclosure. A dry microfibre cloth may be enough to clear a small area directly in front of the lens, but do not use cleaning products or press hard equipment against the glass without permission.
How to reduce reflections in padel glass
Move the lens close to the pane
The simplest reflection-control technique is to reduce the space between the lens and the glass. Place the lens hood close to the pane without pressing a hard hood or front element against it. A flexible rubber hood can create a better light seal.
Wear dark clothing
A white shirt, bright hat or pale camera strap can appear in dark areas of the court. Dark, plain clothing helps the photographer disappear from the reflection.
Shoot from shade
Reflections are harder to control when bright sunlight falls on the photographer’s side of the glass. If you can, work from shade towards a brighter court.
Avoid extreme angles
Shooting diagonally through glass can create strong compositions, but very oblique angles increase the amount of glass the light passes through. Start close to perpendicular, then add angle only when it improves the picture enough to justify the compromise.
Use reflections deliberately
Not every reflection is a mistake. Palm trees, blue sky, a hotel terrace or a watching partner can become a second visual layer. The test is whether the reflection supports the image or covers the player’s face.

Should you use a circular polarising filter?
A circular polarising filter can reduce some reflections from glass, but it is not a magic fix. HOYA explains that a circular polariser can control reflections from surfaces such as glass and that the effect changes as the filter is rotated. HOYA also notes that some polarising filters reduce available light, which matters when you need fast shutter speeds. See HOYA’s guide to how circular polarisers work.
Use a polariser when:
- You are shooting in strong daylight.
- The reflection is clearly damaging the image.
- You can keep the shutter speed fast enough.
- You have time to rotate the filter and test the effect.
Remove it when:
- The court is already dark.
- You need every stop of light.
- The filter has little visible effect from your position.
- The changing angle makes exposure and reflection control inconsistent.
Take comparison frames with and without the filter before the match begins. Do not discover halfway through the session that the polariser has cost you sharpness without meaningfully improving the reflections.
Focus through the glass, not on it
Autofocus can lock onto fingerprints, scratches, reflected spectators or court structure instead of the player. A practical starting setup is:
- Continuous autofocus
- Small or medium focus zone
- Subject or eye detection where reliable
- High-speed continuous shooting
- Back-button focus only if you already use it comfortably
Wide-area tracking can work when the pane is clean, the player is separated from the background and reflections are weak. Use a smaller focus zone when four players overlap, the camera keeps switching faces, the far player is selected instead of the near player, or a reflection confuses tracking.
Some action happens repeatedly in similar locations. Pre-focus or hold a small zone over the service contact area, centre of the net, back-glass defensive zone or usual overhead position.
Best lenses for padel photography
70–200mm: best for action
A 70–200mm zoom is the most versatile action lens from outside the court. It lets you fill the frame with a player at the net, isolate expressions, compress the court and move quickly between full-body and tighter action.
24–70mm: best for context
Use a standard zoom for full-court compositions, group photos, club terraces, players arriving, resort scenes and images that show Spain as well as the sport.
35mm or 50mm prime: best for lifestyle
A fast prime is useful for clubhouse photographs, portraits, equipment details, evening social scenes and shallow-depth-of-field images.
Wide-angle lens: best used sparingly
A wide lens can show the court’s geometry, especially from an elevated position, but it can also exaggerate empty foreground, structural posts and glass distortion.
Best shooting positions around a padel court
1. Directly behind the back glass
This is the cleanest starting position. It gives you faces on the attacking side and a strong sense of court depth.
2. Behind the back-glass corner
This works well for rebounds, diagonal depth and images involving several players. Keep the angle controlled to avoid too much glass distortion.
3. Beside the service area
A side view can capture the low underarm serve, return and partner communication. Watch for fencing, posts and awkward reflections.
4. Elevated above the court
An upper terrace or permitted viewing area can show the full 20m × 10m court, both teams and the surrounding destination. Confirm access rather than climbing on furniture or court structures.
5. Through an open access point
This can give a clean image without glass, but use it only with permission and never block an entrance. FIP rules define access points and safety areas for out-of-court play, so assume the doorway may become part of the rally.
Photographing floodlit and indoor courts
Evening padel can look dramatic because the lit court stands out against darker surroundings. It also creates problems: higher ISO, colour shifts, LED banding, bright lights in frame and reflections behind the photographer.
Before the main session:
- Take a short burst at your intended shutter speed.
- Review several consecutive frames.
- Look for horizontal bands or inconsistent exposure.
- Enable anti-flicker settings if your camera has them.
- Try the mechanical shutter if electronic shutter creates banding.
- Adjust shutter speed if needed.
FIP rules state that artificial light should be uniform and placed so it does not create vision difficulties for players, umpires or spectators. Broadcast-level illumination should not be assumed at an ordinary resort or club court.
How to photograph padel with a phone
A phone can produce strong travel and social images if you work within its limits.
- Clean the phone lens before every session.
- Use the optical telephoto setting where available.
- Avoid heavy digital zoom.
- Tap the player to set focus and exposure.
- Use burst or live-photo mode for action.
- Keep the lens close to the glass and shield it from reflections.
- Avoid portrait mode for unpredictable fast movement.
- Record short video clips of rebounds and rallies.
- Shoot both vertical and horizontal frames.
A phone’s small lens can be easier to shield against glass than a large camera lens. Its main weaknesses are low-light quality, limited shutter control and unreliable subject separation when players overlap.
Build a complete shot list
Do not return with 500 versions of the same forehand. A good Spanish padel story needs action, place, people, details and travel context.
Establishing images
- Full court
- Club exterior
- Hotel or resort connection
- Spanish city, coast or landscape
- Players arriving with rackets
Action images
- Serve
- Volley
- Lob
- Overhead
- Back-glass defence
- Low retrieval
- Partners moving together
Detail images
- Ball against the glass
- Perforated racket face
- Hand on grip
- Court shoes and artificial surface
- Score display
- Water and towel during a break
People and atmosphere
- Partners discussing tactics
- Reaction after a long rally
- Coach giving feedback
- Players meeting local opponents
- Post-match food or drinks
- Group portrait

Ask for access and permission before shooting
Do not assume that booking a padel break gives you permission to photograph every player at the club. Venue permission and permission to publish identifiable photographs are not the same thing.
Before bringing professional equipment, ask:
- Does the club allow photography?
- Can you photograph coaching sessions?
- Are other courts or spectators likely to appear in the background?
- Can images be used editorially, commercially or on social media?
- Are any participants under 18?
- Is a model release required?
- Can you use an elevated terrace?
- Can you photograph through an open access point?
- Is flash prohibited?
- Can you clean a small area of glass?
For a commissioned feature or commercial campaign, record consent and intended image use clearly. Obtain appropriate parental or guardian permission before publishing identifiable photographs of children.
Avoid flash during live play
Flash can reflect strongly from glass and may distract players during a fast rally. Do not use it during live play unless the venue, organiser and participants have approved it.
Adobe notes that flash at indoor sports events should be cleared with officials and used only where it will not distract or affect athletes. With padel’s reflective enclosure and close sightlines, available light is usually the safer and more natural approach.
Flash can still be useful for a controlled portrait after the match, when the photographer and players can choose the angle deliberately.
Choose a Spanish destination that gives you a story
Different Spanish destinations create different photographs. Choose the setting based on the story you want to bring home, not only the number of courts.
| Destination | Best visual angle | Photography note |
|---|---|---|
| Marbella and Costa del Sol | Resort courts, coastal light, terraces and palms | Best at morning and late-afternoon light. |
| Barcelona | Urban sport, beach context and architecture | Good for a wider city-and-padel story. |
| Madrid | Club culture, indoor courts, cafés and city portraits | Useful if you want sport without relying on coastal imagery. |
| Valencia | Mediterranean light, modern city backgrounds and marina context | Good for compact sport-and-city coverage. |
| Mallorca | Island scenery, resort groups, coast and mountains | Strong for a longer travel story beyond the court. |
Edit for clarity without removing the character of the court
Start with technical corrections: white balance, exposure, highlight recovery, colour casts, noise reduction, lens corrections and vertical alignment.
Then work locally. A mask over the player can restore contrast without exaggerating every scratch in the glass. A second mask may reduce a distracting sign or reflection.
Avoid heavy global clarity or dehaze. It can make dirt, fencing, halos and glass texture look worse. Do not remove every sign of the enclosure either. The glass, mesh and reflected light are part of padel’s visual identity.
Camera kit for a three- or four-night padel break
- Main camera body
- Optional backup body
- 70–200mm or equivalent telephoto zoom
- 24–70mm or standard zoom
- Optional fast 35mm or 50mm prime
- Lens hoods
- Flexible rubber hood for shooting through glass
- Circular polarising filter
- Microfibre cloths
- Spare batteries
- Several memory cards
- Chargers and plug adaptor
- Light rain cover
- Portable backup drive or secure cloud workflow
- Dark cloth or jacket for reflection control
A monopod can help with a heavy telephoto lens, but it may be more cumbersome than useful beside a narrow court walkway. Get permission and keep every support clear of entrances.
Simple three-day photography plan
Day 1: scout and establish
- Visit the club before the main session.
- Check access and permission.
- Inspect the glass and lighting.
- Take venue, court and destination photographs.
- Test the polariser and autofocus.
Day 2: photograph the main action
- Begin behind the back glass.
- Secure sharp serve, volley and overhead frames.
- Move to the side for glass rebounds.
- Photograph coaching and player reactions.
- Try creative motion only after covering the essentials.
Day 3: complete the travel story
- Take controlled player portraits.
- Photograph rackets, shoes and court details.
- Capture the group away from the court.
- Add city, beach, hotel or resort context.
- Back up and review the final sequence.
Final padel photography checklist
- Venue and player permission confirmed
- Clean shooting pane selected
- Safe position away from entrances
- Fast enough shutter speed
- Continuous autofocus enabled
- Short-burst drive mode set
- RAW capture selected
- Reflection control tested
- Anti-flicker checked under lights
- Spare battery and memory card ready
- Wide, action, detail and reaction shot list prepared
- Spanish destination context planned
Frequently asked questions
Can you take sharp padel photographs through glass?
Yes. Use the cleanest pane, keep the lens close to the glass, block reflections and focus on the player with continuous autofocus. Avoid heavily angled positions unless they materially improve the composition.
What shutter speed is best for padel?
Around 1/1000 second is a useful daylight starting point. Use faster settings for overheads or frozen ball contact, and slower settings only when you deliberately want motion blur.
Does a polarising filter remove padel-glass reflections?
It can reduce some reflections, but the effect depends on angle and light. It also reduces available light, so test it before relying on it for action.
What lens is best for padel photography?
A 70–200mm zoom is the most versatile action lens from outside the court. A 24–70mm lens is better for full-court, group and destination photographs.
Should you use flash?
Generally not during live play. Flash can reflect from the glass and distract players. Use it only with explicit permission, preferably for controlled portraits after play.
Where should you stand?
Start behind the back glass, then try the back corner and side glass. Elevated viewpoints can show court geometry. Never block a lateral access point.
Can you photograph padel with a phone?
Yes. Clean the lens, use optical zoom where available, place the phone close to the glass, shield reflections and use burst or live-photo mode for action.
Which Spanish destination is best for padel photography?
Marbella and the Costa del Sol work well for resort and coastal imagery. Barcelona and Madrid provide stronger urban stories, while Mallorca combines padel with island scenery.
Final thoughts
Glass is both the problem and the opportunity in padel photography. It can lower contrast, confuse autofocus and fill the frame with unwanted reflections. It can also create depth, symmetry and layered images that make padel look different from every other racket sport.
Control the glass first: use a clean pane, keep the lens close, block stray light and choose your angle carefully. Then let the enclosure become part of the story. Photograph the defender waiting for the rebound, the attacking pair beyond the net, and the Spanish sky reflected faintly across the pane.
The best padel photograph should not simply show a player hitting a ball. It should explain why photographing padel through glass feels different.
