Recent News
How to Photograph Padel Through Glass on a...
How to Take Better Photos With an iPhone
What You Should Do With Your Old Printed...
Phone Camera Settings Explained for Beginners
How to Choose the Right GoPro Accessories for...
7 Tips For Starting Out In Photography
Framing the Fairway: The Art of Photographing Golf...
Best Photo Opportunities in Miami
How to protect your brand from malicious and...
Six Tips to Consider When Creating an Outstanding...
  • About Us
  • Write For Us
  • Advertise
  • Resources
  • Contact Us
DC Mag
  • Home
  • Advice
    • Photography Showcase
    • Tips and Techniques
  • Brands
  • Reviews
  • Roundups
  • Trends
  • Camera Bag
  • Marketing
  • Online
  • Contact Us

Tips and Techniques

Tips and Techniques

How to Photograph Padel Through Glass on a Spanish Sports Break

by Mark Bailey September 3, 2026
written by Mark Bailey

Padel should be a brilliant sport to photograph. Four players share a compact court, rallies move quickly, reactions happen close to the camera, and the glass walls create images you cannot get in tennis or squash. The problem is that the same glass that makes padel visually distinctive also makes it technically awkward.

Shoot from the wrong angle and the glass can fill your frame with reflections, flare, fingerprints, colour casts and ghost images of the photographer. Autofocus may grab the pane instead of the player. A clean rally can become a low-contrast image with a bright reflection across the face.

This guide explains how to photograph padel through glass on a Spanish sports break: where to stand, which settings to start with, how to reduce reflections, when to use a polarising filter, what lenses to pack and how to build a complete travel-and-sport photo story.

Spain is a useful place to practise because padel is widely available across the country. Spain’s official tourism site describes Spain as one of the countries with the most options for playing padel and states that it has more than 17,000 courts, with strong padel destinations including Barcelona, Madrid, Málaga, Marbella, Valencia and Alicante.

If you are still choosing where to shoot, compare destinations by the type of images you want to bring home. Resort locations such as Marbella and the Costa del Sol work well for coastal light, terraces and outdoor courts, while Barcelona, Madrid and Valencia can give you a stronger city-and-sport story. For a practical starting point, you can compare padel holidays in Spain by destination, coaching options, group suitability and travel style.

Quick answer: how do you photograph padel through glass?

Find the cleanest pane, keep the front of the lens close to the glass, block stray light with a lens hood or rubber hood, wear dark clothing, and shoot from shade where possible. Use continuous autofocus, a fast shutter speed and short bursts. Avoid extreme diagonal angles through dirty glass unless the composition is worth the loss of contrast.

A useful daylight starting point is:

  • Shutter speed: 1/1000 to 1/2000 second for sharp action
  • Aperture: f/2.8 to f/4 for one main player, f/4 to f/5.6 for two players
  • ISO: Auto ISO or a manually selected ISO that protects the shutter speed
  • Focus: continuous autofocus with a small or medium zone
  • Drive mode: high-speed continuous, used in short bursts
  • File type: RAW, or RAW and JPEG

These are starting settings, not rules. Adobe’s shutter speed guide explains that fast shutter speeds freeze motion, while slower shutter speeds can show movement. In padel, you will usually secure sharp action first, then experiment with slower panning shots later.

Padel photography settings by situation

Shooting situation Starting shutter speed Starting aperture Key technique
Bright outdoor court 1/1000–1/2000 sec f/2.8–f/5.6 Protect highlights and watch sky reflections.
Cloudy or shaded court 1/800–1/1600 sec f/2.8–f/4 Use Auto ISO and check faces for sharpness.
Floodlit evening match 1/640–1/1000 sec Widest useful aperture Test for LED banding and use anti-flicker settings if available.
Creative panning shot 1/30–1/80 sec Exposure-dependent Follow the player smoothly through the frame.
Portrait through glass 1/250 sec or faster f/2–f/4 Keep the lens close to a clean pane and simplify the background.

Understand the court before choosing a position

A regulation padel court is a rectangle measuring 10 metres wide by 20 metres long. The International Padel Federation’s Rules of Padel define the court, enclosure, access points, lighting and racket requirements. The court dimensions matter because they shape your lens choice and shooting position.

Padel is usually played as doubles, and the court is surrounded by glass walls, fencing and side access points. The LTA’s beginner padel rules explain the underarm serve, doubles format, walls, cage and basic rally rules.

For photography, the court creates layers:

  • The near pane of glass
  • The nearest player
  • The net
  • The opposing pair
  • The far wall or fence
  • The club, spectators or scenery behind the court

A weak photograph lets those layers compete. A strong photograph uses them deliberately.

Learn the rally before trying to follow it

Good sports photography depends on anticipation. Adobe’s sports photography guidance recommends learning the rules and strategy of the sport because that helps photographers choose where to stand and predict moments before they happen.

The serve

The server stands behind the service line, bounces the ball and serves underarm. Begin the burst as the player drops or bounces the ball, not after you hear contact.

The move to the net

The serving pair will often move forward to attack. From behind the opposite back glass, you can often capture faces, communication and volleys at the net.

The lob and overhead

A defensive lob often sets up an overhead. Watch the player’s preparation: shoulder turn, raised non-racket arm and movement under the ball usually tell you the shot is coming.

The back-glass rebound

This is the shot that makes padel look like padel. The defender lets the ball pass, turns towards the glass and plays it after the rebound. A side or diagonal angle can show player, ball and glass in one frame.

The point after the point

Do not lower the camera when the ball goes dead. Partners touch rackets, laugh, discuss positioning or react to a missed chance. Those frames often say more about a sports holiday than another clean forehand.

Scout the glass before play starts

Arrive early and inspect the court before the main session. You are looking for the pane that gives you the cleanest optical path and the fewest distractions.

  • Clean panes with fewer fingerprints and water marks
  • Scratches, joins and damaged areas
  • Bright signs or white walls behind you
  • Reflections from spectators, windows and nearby buildings
  • The direction of the sun
  • Glass seams and structural supports
  • Lighting poles and floodlights
  • Elevated viewing areas

Ask the club before cleaning any part of the enclosure. A dry microfibre cloth may be enough to clear a small area directly in front of the lens, but do not use cleaning products or press hard equipment against the glass without permission.

How to reduce reflections in padel glass

Move the lens close to the pane

The simplest reflection-control technique is to reduce the space between the lens and the glass. Place the lens hood close to the pane without pressing a hard hood or front element against it. A flexible rubber hood can create a better light seal.

Wear dark clothing

A white shirt, bright hat or pale camera strap can appear in dark areas of the court. Dark, plain clothing helps the photographer disappear from the reflection.

Shoot from shade

Reflections are harder to control when bright sunlight falls on the photographer’s side of the glass. If you can, work from shade towards a brighter court.

Avoid extreme angles

Shooting diagonally through glass can create strong compositions, but very oblique angles increase the amount of glass the light passes through. Start close to perpendicular, then add angle only when it improves the picture enough to justify the compromise.

Use reflections deliberately

Not every reflection is a mistake. Palm trees, blue sky, a hotel terrace or a watching partner can become a second visual layer. The test is whether the reflection supports the image or covers the player’s face.

Should you use a circular polarising filter?

A circular polarising filter can reduce some reflections from glass, but it is not a magic fix. HOYA explains that a circular polariser can control reflections from surfaces such as glass and that the effect changes as the filter is rotated. HOYA also notes that some polarising filters reduce available light, which matters when you need fast shutter speeds. See HOYA’s guide to how circular polarisers work.

Use a polariser when:

  • You are shooting in strong daylight.
  • The reflection is clearly damaging the image.
  • You can keep the shutter speed fast enough.
  • You have time to rotate the filter and test the effect.

Remove it when:

  • The court is already dark.
  • You need every stop of light.
  • The filter has little visible effect from your position.
  • The changing angle makes exposure and reflection control inconsistent.

Take comparison frames with and without the filter before the match begins. Do not discover halfway through the session that the polariser has cost you sharpness without meaningfully improving the reflections.

Focus through the glass, not on it

Autofocus can lock onto fingerprints, scratches, reflected spectators or court structure instead of the player. A practical starting setup is:

  • Continuous autofocus
  • Small or medium focus zone
  • Subject or eye detection where reliable
  • High-speed continuous shooting
  • Back-button focus only if you already use it comfortably

Wide-area tracking can work when the pane is clean, the player is separated from the background and reflections are weak. Use a smaller focus zone when four players overlap, the camera keeps switching faces, the far player is selected instead of the near player, or a reflection confuses tracking.

Some action happens repeatedly in similar locations. Pre-focus or hold a small zone over the service contact area, centre of the net, back-glass defensive zone or usual overhead position.

Best lenses for padel photography

70–200mm: best for action

A 70–200mm zoom is the most versatile action lens from outside the court. It lets you fill the frame with a player at the net, isolate expressions, compress the court and move quickly between full-body and tighter action.

24–70mm: best for context

Use a standard zoom for full-court compositions, group photos, club terraces, players arriving, resort scenes and images that show Spain as well as the sport.

35mm or 50mm prime: best for lifestyle

A fast prime is useful for clubhouse photographs, portraits, equipment details, evening social scenes and shallow-depth-of-field images.

Wide-angle lens: best used sparingly

A wide lens can show the court’s geometry, especially from an elevated position, but it can also exaggerate empty foreground, structural posts and glass distortion.

Best shooting positions around a padel court

1. Directly behind the back glass

This is the cleanest starting position. It gives you faces on the attacking side and a strong sense of court depth.

2. Behind the back-glass corner

This works well for rebounds, diagonal depth and images involving several players. Keep the angle controlled to avoid too much glass distortion.

3. Beside the service area

A side view can capture the low underarm serve, return and partner communication. Watch for fencing, posts and awkward reflections.

4. Elevated above the court

An upper terrace or permitted viewing area can show the full 20m × 10m court, both teams and the surrounding destination. Confirm access rather than climbing on furniture or court structures.

5. Through an open access point

This can give a clean image without glass, but use it only with permission and never block an entrance. FIP rules define access points and safety areas for out-of-court play, so assume the doorway may become part of the rally.

Photographing floodlit and indoor courts

Evening padel can look dramatic because the lit court stands out against darker surroundings. It also creates problems: higher ISO, colour shifts, LED banding, bright lights in frame and reflections behind the photographer.

Before the main session:

  1. Take a short burst at your intended shutter speed.
  2. Review several consecutive frames.
  3. Look for horizontal bands or inconsistent exposure.
  4. Enable anti-flicker settings if your camera has them.
  5. Try the mechanical shutter if electronic shutter creates banding.
  6. Adjust shutter speed if needed.

FIP rules state that artificial light should be uniform and placed so it does not create vision difficulties for players, umpires or spectators. Broadcast-level illumination should not be assumed at an ordinary resort or club court.

How to photograph padel with a phone

A phone can produce strong travel and social images if you work within its limits.

  • Clean the phone lens before every session.
  • Use the optical telephoto setting where available.
  • Avoid heavy digital zoom.
  • Tap the player to set focus and exposure.
  • Use burst or live-photo mode for action.
  • Keep the lens close to the glass and shield it from reflections.
  • Avoid portrait mode for unpredictable fast movement.
  • Record short video clips of rebounds and rallies.
  • Shoot both vertical and horizontal frames.

A phone’s small lens can be easier to shield against glass than a large camera lens. Its main weaknesses are low-light quality, limited shutter control and unreliable subject separation when players overlap.

Build a complete shot list

Do not return with 500 versions of the same forehand. A good Spanish padel story needs action, place, people, details and travel context.

Establishing images

  • Full court
  • Club exterior
  • Hotel or resort connection
  • Spanish city, coast or landscape
  • Players arriving with rackets

Action images

  • Serve
  • Volley
  • Lob
  • Overhead
  • Back-glass defence
  • Low retrieval
  • Partners moving together

Detail images

  • Ball against the glass
  • Perforated racket face
  • Hand on grip
  • Court shoes and artificial surface
  • Score display
  • Water and towel during a break

People and atmosphere

  • Partners discussing tactics
  • Reaction after a long rally
  • Coach giving feedback
  • Players meeting local opponents
  • Post-match food or drinks
  • Group portrait

Ask for access and permission before shooting

Do not assume that booking a padel break gives you permission to photograph every player at the club. Venue permission and permission to publish identifiable photographs are not the same thing.

Before bringing professional equipment, ask:

  • Does the club allow photography?
  • Can you photograph coaching sessions?
  • Are other courts or spectators likely to appear in the background?
  • Can images be used editorially, commercially or on social media?
  • Are any participants under 18?
  • Is a model release required?
  • Can you use an elevated terrace?
  • Can you photograph through an open access point?
  • Is flash prohibited?
  • Can you clean a small area of glass?

For a commissioned feature or commercial campaign, record consent and intended image use clearly. Obtain appropriate parental or guardian permission before publishing identifiable photographs of children.

Avoid flash during live play

Flash can reflect strongly from glass and may distract players during a fast rally. Do not use it during live play unless the venue, organiser and participants have approved it.

Adobe notes that flash at indoor sports events should be cleared with officials and used only where it will not distract or affect athletes. With padel’s reflective enclosure and close sightlines, available light is usually the safer and more natural approach.

Flash can still be useful for a controlled portrait after the match, when the photographer and players can choose the angle deliberately.

Choose a Spanish destination that gives you a story

Different Spanish destinations create different photographs. Choose the setting based on the story you want to bring home, not only the number of courts.

Destination Best visual angle Photography note
Marbella and Costa del Sol Resort courts, coastal light, terraces and palms Best at morning and late-afternoon light.
Barcelona Urban sport, beach context and architecture Good for a wider city-and-padel story.
Madrid Club culture, indoor courts, cafés and city portraits Useful if you want sport without relying on coastal imagery.
Valencia Mediterranean light, modern city backgrounds and marina context Good for compact sport-and-city coverage.
Mallorca Island scenery, resort groups, coast and mountains Strong for a longer travel story beyond the court.

Edit for clarity without removing the character of the court

Start with technical corrections: white balance, exposure, highlight recovery, colour casts, noise reduction, lens corrections and vertical alignment.

Then work locally. A mask over the player can restore contrast without exaggerating every scratch in the glass. A second mask may reduce a distracting sign or reflection.

Avoid heavy global clarity or dehaze. It can make dirt, fencing, halos and glass texture look worse. Do not remove every sign of the enclosure either. The glass, mesh and reflected light are part of padel’s visual identity.

Camera kit for a three- or four-night padel break

  • Main camera body
  • Optional backup body
  • 70–200mm or equivalent telephoto zoom
  • 24–70mm or standard zoom
  • Optional fast 35mm or 50mm prime
  • Lens hoods
  • Flexible rubber hood for shooting through glass
  • Circular polarising filter
  • Microfibre cloths
  • Spare batteries
  • Several memory cards
  • Chargers and plug adaptor
  • Light rain cover
  • Portable backup drive or secure cloud workflow
  • Dark cloth or jacket for reflection control

A monopod can help with a heavy telephoto lens, but it may be more cumbersome than useful beside a narrow court walkway. Get permission and keep every support clear of entrances.

Simple three-day photography plan

Day 1: scout and establish

  • Visit the club before the main session.
  • Check access and permission.
  • Inspect the glass and lighting.
  • Take venue, court and destination photographs.
  • Test the polariser and autofocus.

Day 2: photograph the main action

  • Begin behind the back glass.
  • Secure sharp serve, volley and overhead frames.
  • Move to the side for glass rebounds.
  • Photograph coaching and player reactions.
  • Try creative motion only after covering the essentials.

Day 3: complete the travel story

  • Take controlled player portraits.
  • Photograph rackets, shoes and court details.
  • Capture the group away from the court.
  • Add city, beach, hotel or resort context.
  • Back up and review the final sequence.

Final padel photography checklist

  • Venue and player permission confirmed
  • Clean shooting pane selected
  • Safe position away from entrances
  • Fast enough shutter speed
  • Continuous autofocus enabled
  • Short-burst drive mode set
  • RAW capture selected
  • Reflection control tested
  • Anti-flicker checked under lights
  • Spare battery and memory card ready
  • Wide, action, detail and reaction shot list prepared
  • Spanish destination context planned

Frequently asked questions

Can you take sharp padel photographs through glass?

Yes. Use the cleanest pane, keep the lens close to the glass, block reflections and focus on the player with continuous autofocus. Avoid heavily angled positions unless they materially improve the composition.

What shutter speed is best for padel?

Around 1/1000 second is a useful daylight starting point. Use faster settings for overheads or frozen ball contact, and slower settings only when you deliberately want motion blur.

Does a polarising filter remove padel-glass reflections?

It can reduce some reflections, but the effect depends on angle and light. It also reduces available light, so test it before relying on it for action.

What lens is best for padel photography?

A 70–200mm zoom is the most versatile action lens from outside the court. A 24–70mm lens is better for full-court, group and destination photographs.

Should you use flash?

Generally not during live play. Flash can reflect from the glass and distract players. Use it only with explicit permission, preferably for controlled portraits after play.

Where should you stand?

Start behind the back glass, then try the back corner and side glass. Elevated viewpoints can show court geometry. Never block a lateral access point.

Can you photograph padel with a phone?

Yes. Clean the lens, use optical zoom where available, place the phone close to the glass, shield reflections and use burst or live-photo mode for action.

Which Spanish destination is best for padel photography?

Marbella and the Costa del Sol work well for resort and coastal imagery. Barcelona and Madrid provide stronger urban stories, while Mallorca combines padel with island scenery.

Final thoughts

Glass is both the problem and the opportunity in padel photography. It can lower contrast, confuse autofocus and fill the frame with unwanted reflections. It can also create depth, symmetry and layered images that make padel look different from every other racket sport.

Control the glass first: use a clean pane, keep the lens close, block stray light and choose your angle carefully. Then let the enclosure become part of the story. Photograph the defender waiting for the rebound, the attacking pair beyond the net, and the Spanish sky reflected faintly across the pane.

The best padel photograph should not simply show a player hitting a ball. It should explain why photographing padel through glass feels different.

  • ISO: Auto ISO or a manually selected ISO that protects the shutter speed
  • Focus: continuous autofocus with a small or medium zone
  • Drive mode: high-speed continuous, used in short bursts
  • File type: RAW, or RAW and JPEG

These are starting settings, not rules. Adobe’s shutter speed guide explains that fast shutter speeds freeze motion, while slower shutter speeds can show movement. In padel, you will usually secure sharp action first, then experiment with slower panning shots later.

Padel photography settings by situation

Shooting situation Starting shutter speed Starting aperture Key technique
Bright outdoor court 1/1000–1/2000 sec f/2.8–f/5.6 Protect highlights and watch sky reflections.
Cloudy or shaded court 1/800–1/1600 sec f/2.8–f/4 Use Auto ISO and check faces for sharpness.
Floodlit evening match 1/640–1/1000 sec Widest useful aperture Test for LED banding and use anti-flicker settings if available.
Creative panning shot 1/30–1/80 sec Exposure-dependent Follow the player smoothly through the frame.
Portrait through glass 1/250 sec or faster f/2–f/4 Keep the lens close to a clean pane and simplify the background.

Understand the court before choosing a position

A regulation padel court is a rectangle measuring 10 metres wide by 20 metres long. The International Padel Federation’s Rules of Padel define the court, enclosure, access points, lighting and racket requirements. The court dimensions matter because they shape your lens choice and shooting position.

Padel is usually played as doubles, and the court is surrounded by glass walls, fencing and side access points. The LTA’s beginner padel rules explain the underarm serve, doubles format, walls, cage and basic rally rules.

For photography, the court creates layers:

  • The near pane of glass
  • The nearest player
  • The net
  • The opposing pair
  • The far wall or fence
  • The club, spectators or scenery behind the court

A weak photograph lets those layers compete. A strong photograph uses them deliberately.

Learn the rally before trying to follow it

Good sports photography depends on anticipation. Adobe’s sports photography guidance recommends learning the rules and strategy of the sport because that helps photographers choose where to stand and predict moments before they happen.

The serve

The server stands behind the service line, bounces the ball and serves underarm. Begin the burst as the player drops or bounces the ball, not after you hear contact.

The move to the net

The serving pair will often move forward to attack. From behind the opposite back glass, you can often capture faces, communication and volleys at the net.

The lob and overhead

A defensive lob often sets up an overhead. Watch the player’s preparation: shoulder turn, raised non-racket arm and movement under the ball usually tell you the shot is coming.

The back-glass rebound

This is the shot that makes padel look like padel. The defender lets the ball pass, turns towards the glass and plays it after the rebound. A side or diagonal angle can show player, ball and glass in one frame.

The point after the point

Do not lower the camera when the ball goes dead. Partners touch rackets, laugh, discuss positioning or react to a missed chance. Those frames often say more about a sports holiday than another clean forehand.

Scout the glass before play starts

Arrive early and inspect the court before the main session. You are looking for the pane that gives you the cleanest optical path and the fewest distractions.

  • Clean panes with fewer fingerprints and water marks
  • Scratches, joins and damaged areas
  • Bright signs or white walls behind you
  • Reflections from spectators, windows and nearby buildings
  • The direction of the sun
  • Glass seams and structural supports
  • Lighting poles and floodlights
  • Elevated viewing areas

Ask the club before cleaning any part of the enclosure. A dry microfibre cloth may be enough to clear a small area directly in front of the lens, but do not use cleaning products or press hard equipment against the glass without permission.

How to reduce reflections in padel glass

Move the lens close to the pane

The simplest reflection-control technique is to reduce the space between the lens and the glass. Place the lens hood close to the pane without pressing a hard hood or front element against it. A flexible rubber hood can create a better light seal.

Wear dark clothing

A white shirt, bright hat or pale camera strap can appear in dark areas of the court. Dark, plain clothing helps the photographer disappear from the reflection.

Shoot from shade

Reflections are harder to control when bright sunlight falls on the photographer’s side of the glass. If you can, work from shade towards a brighter court.

Avoid extreme angles

Shooting diagonally through glass can create strong compositions, but very oblique angles increase the amount of glass the light passes through. Start close to perpendicular, then add angle only when it improves the picture enough to justify the compromise.

Use reflections deliberately

Not every reflection is a mistake. Palm trees, blue sky, a hotel terrace or a watching partner can become a second visual layer. The test is whether the reflection supports the image or covers the player’s face.

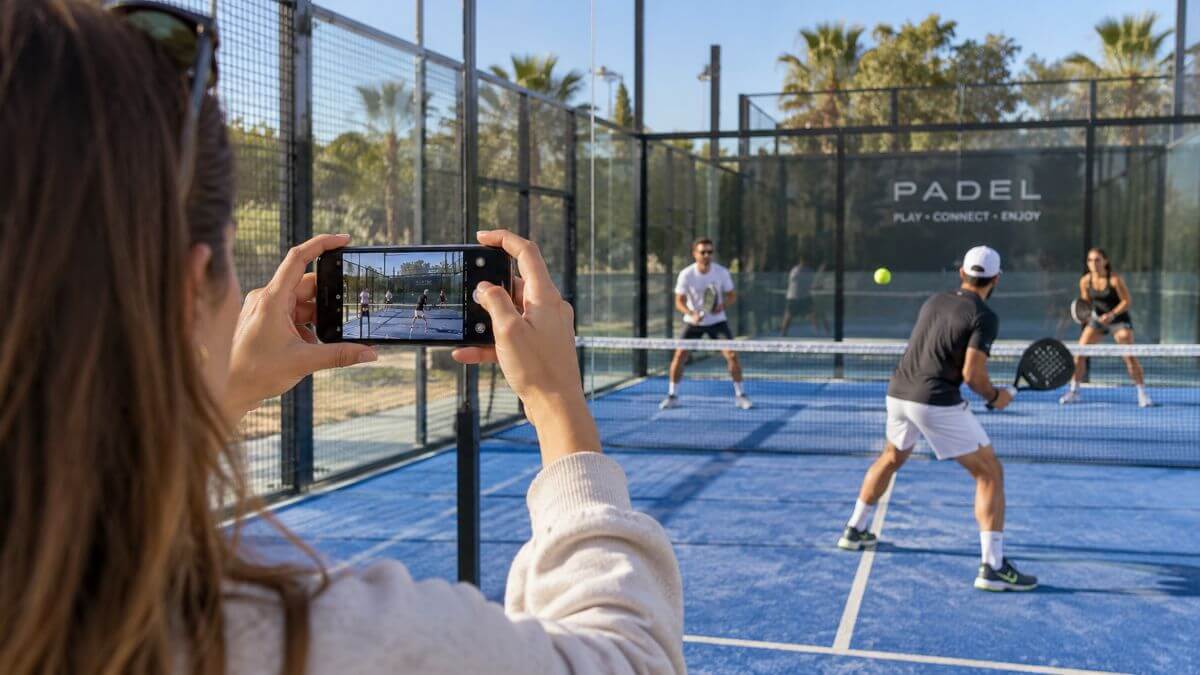
Camera lens held close to padel court glass to reduce reflections
Show the technique visually: lens close to clean glass, dark clothing and a shaded shooting position.

Should you use a circular polarising filter?

A circular polarising filter can reduce some reflections from glass, but it is not a magic fix. HOYA explains that a circular polariser can control reflections from surfaces such as glass and that the effect changes as the filter is rotated. HOYA also notes that some polarising filters reduce available light, which matters when you need fast shutter speeds. See HOYA’s guide to how circular polarisers work.

Use a polariser when:

  • You are shooting in strong daylight.
  • The reflection is clearly damaging the image.
  • You can keep the shutter speed fast enough.
  • You have time to rotate the filter and test the effect.

Remove it when:

  • The court is already dark.
  • You need every stop of light.
  • The filter has little visible effect from your position.
  • The changing angle makes exposure and reflection control inconsistent.

Take comparison frames with and without the filter before the match begins. Do not discover halfway through the session that the polariser has cost you sharpness without meaningfully improving the reflections.

Focus through the glass, not on it

Autofocus can lock onto fingerprints, scratches, reflected spectators or court structure instead of the player. A practical starting setup is:

  • Continuous autofocus
  • Small or medium focus zone
  • Subject or eye detection where reliable
  • High-speed continuous shooting
  • Back-button focus only if you already use it comfortably

Wide-area tracking can work when the pane is clean, the player is separated from the background and reflections are weak. Use a smaller focus zone when four players overlap, the camera keeps switching faces, the far player is selected instead of the near player, or a reflection confuses tracking.

Some action happens repeatedly in similar locations. Pre-focus or hold a small zone over the service contact area, centre of the net, back-glass defensive zone or usual overhead position.

Best lenses for padel photography

70–200mm: best for action

A 70–200mm zoom is the most versatile action lens from outside the court. It lets you fill the frame with a player at the net, isolate expressions, compress the court and move quickly between full-body and tighter action.

24–70mm: best for context

Use a standard zoom for full-court compositions, group photos, club terraces, players arriving, resort scenes and images that show Spain as well as the sport.

35mm or 50mm prime: best for lifestyle

A fast prime is useful for clubhouse photographs, portraits, equipment details, evening social scenes and shallow-depth-of-field images.

Wide-angle lens: best used sparingly

A wide lens can show the court’s geometry, especially from an elevated position, but it can also exaggerate empty foreground, structural posts and glass distortion.

Best shooting positions around a padel court

1. Directly behind the back glass

This is the cleanest starting position. It gives you faces on the attacking side and a strong sense of court depth.

2. Behind the back-glass corner

This works well for rebounds, diagonal depth and images involving several players. Keep the angle controlled to avoid too much glass distortion.

3. Beside the service area

A side view can capture the low underarm serve, return and partner communication. Watch for fencing, posts and awkward reflections.

4. Elevated above the court

An upper terrace or permitted viewing area can show the full 20m × 10m court, both teams and the surrounding destination. Confirm access rather than climbing on furniture or court structures.

5. Through an open access point

This can give a clean image without glass, but use it only with permission and never block an entrance. FIP rules define access points and safety areas for out-of-court play, so assume the doorway may become part of the rally.

Photographing floodlit and indoor courts

Evening padel can look dramatic because the lit court stands out against darker surroundings. It also creates problems: higher ISO, colour shifts, LED banding, bright lights in frame and reflections behind the photographer.

Before the main session:

  1. Take a short burst at your intended shutter speed.
  2. Review several consecutive frames.
  3. Look for horizontal bands or inconsistent exposure.
  4. Enable anti-flicker settings if your camera has them.
  5. Try the mechanical shutter if electronic shutter creates banding.
  6. Adjust shutter speed if needed.

FIP rules state that artificial light should be uniform and placed so it does not create vision difficulties for players, umpires or spectators. Broadcast-level illumination should not be assumed at an ordinary resort or club court.

How to photograph padel with a phone

A phone can produce strong travel and social images if you work within its limits.

  • Clean the phone lens before every session.
  • Use the optical telephoto setting where available.
  • Avoid heavy digital zoom.
  • Tap the player to set focus and exposure.
  • Use burst or live-photo mode for action.
  • Keep the lens close to the glass and shield it from reflections.
  • Avoid portrait mode for unpredictable fast movement.
  • Record short video clips of rebounds and rallies.
  • Shoot both vertical and horizontal frames.

A phone’s small lens can be easier to shield against glass than a large camera lens. Its main weaknesses are low-light quality, limited shutter control and unreliable subject separation when players overlap.

Build a complete shot list

Do not return with 500 versions of the same forehand. A good Spanish padel story needs action, place, people, details and travel context.

Establishing images

  • Full court
  • Club exterior
  • Hotel or resort connection
  • Spanish city, coast or landscape
  • Players arriving with rackets

Action images

  • Serve
  • Volley
  • Lob
  • Overhead
  • Back-glass defence
  • Low retrieval
  • Partners moving together

Detail images

  • Ball against the glass
  • Perforated racket face
  • Hand on grip
  • Court shoes and artificial surface
  • Score display
  • Water and towel during a break

People and atmosphere

  • Partners discussing tactics
  • Reaction after a long rally
  • Coach giving feedback
  • Players meeting local opponents
  • Post-match food or drinks
  • Group portrait
Padel photography shot list showing action, detail and travel images from Spain
A full photo story should include action, details, people and destination context.

Ask for access and permission before shooting

Do not assume that booking a padel break gives you permission to photograph every player at the club. Venue permission and permission to publish identifiable photographs are not the same thing.

Before bringing professional equipment, ask:

  • Does the club allow photography?
  • Can you photograph coaching sessions?
  • Are other courts or spectators likely to appear in the background?
  • Can images be used editorially, commercially or on social media?
  • Are any participants under 18?
  • Is a model release required?
  • Can you use an elevated terrace?
  • Can you photograph through an open access point?
  • Is flash prohibited?
  • Can you clean a small area of glass?

For a commissioned feature or commercial campaign, record consent and intended image use clearly. Obtain appropriate parental or guardian permission before publishing identifiable photographs of children.

Avoid flash during live play

Flash can reflect strongly from glass and may distract players during a fast rally. Do not use it during live play unless the venue, organiser and participants have approved it.

Adobe notes that flash at indoor sports events should be cleared with officials and used only where it will not distract or affect athletes. With padel’s reflective enclosure and close sightlines, available light is usually the safer and more natural approach.

Flash can still be useful for a controlled portrait after the match, when the photographer and players can choose the angle deliberately.

Choose a Spanish destination that gives you a story

Different Spanish destinations create different photographs. Choose the setting based on the story you want to bring home, not only the number of courts.

Destination Best visual angle Photography note
Marbella and Costa del Sol Resort courts, coastal light, terraces and palms Best at morning and late-afternoon light.
Barcelona Urban sport, beach context and architecture Good for a wider city-and-padel story.
Madrid Club culture, indoor courts, cafés and city portraits Useful if you want sport without relying on coastal imagery.
Valencia Mediterranean light, modern city backgrounds and marina context Good for compact sport-and-city coverage.
Mallorca Island scenery, resort groups, coast and mountains Strong for a longer travel story beyond the court.

Edit for clarity without removing the character of the court

Start with technical corrections: white balance, exposure, highlight recovery, colour casts, noise reduction, lens corrections and vertical alignment.

Then work locally. A mask over the player can restore contrast without exaggerating every scratch in the glass. A second mask may reduce a distracting sign or reflection.

Avoid heavy global clarity or dehaze. It can make dirt, fencing, halos and glass texture look worse. Do not remove every sign of the enclosure either. The glass, mesh and reflected light are part of padel’s visual identity.

Camera kit for a three- or four-night padel break

  • Main camera body
  • Optional backup body
  • 70–200mm or equivalent telephoto zoom
  • 24–70mm or standard zoom
  • Optional fast 35mm or 50mm prime
  • Lens hoods
  • Flexible rubber hood for shooting through glass
  • Circular polarising filter
  • Microfibre cloths
  • Spare batteries
  • Several memory cards
  • Chargers and plug adaptor
  • Light rain cover
  • Portable backup drive or secure cloud workflow
  • Dark cloth or jacket for reflection control

A monopod can help with a heavy telephoto lens, but it may be more cumbersome than useful beside a narrow court walkway. Get permission and keep every support clear of entrances.

Simple three-day photography plan

Day 1: scout and establish

  • Visit the club before the main session.
  • Check access and permission.
  • Inspect the glass and lighting.
  • Take venue, court and destination photographs.
  • Test the polariser and autofocus.

Day 2: photograph the main action

  • Begin behind the back glass.
  • Secure sharp serve, volley and overhead frames.
  • Move to the side for glass rebounds.
  • Photograph coaching and player reactions.
  • Try creative motion only after covering the essentials.

Day 3: complete the travel story

  • Take controlled player portraits.
  • Photograph rackets, shoes and court details.
  • Capture the group away from the court.
  • Add city, beach, hotel or resort context.
  • Back up and review the final sequence.

Final padel photography checklist

  • Venue and player permission confirmed
  • Clean shooting pane selected
  • Safe position away from entrances
  • Fast enough shutter speed
  • Continuous autofocus enabled
  • Short-burst drive mode set
  • RAW capture selected
  • Reflection control tested
  • Anti-flicker checked under lights
  • Spare battery and memory card ready
  • Wide, action, detail and reaction shot list prepared
  • Spanish destination context planned

Frequently asked questions

Can you take sharp padel photographs through glass?

Yes. Use the cleanest pane, keep the lens close to the glass, block reflections and focus on the player with continuous autofocus. Avoid heavily angled positions unless they materially improve the composition.

What shutter speed is best for padel?

Around 1/1000 second is a useful daylight starting point. Use faster settings for overheads or frozen ball contact, and slower settings only when you deliberately want motion blur.

Does a polarising filter remove padel-glass reflections?

It can reduce some reflections, but the effect depends on angle and light. It also reduces available light, so test it before relying on it for action.

What lens is best for padel photography?

A 70–200mm zoom is the most versatile action lens from outside the court. A 24–70mm lens is better for full-court, group and destination photographs.

Should you use flash?

Generally not during live play. Flash can reflect from the glass and distract players. Use it only with explicit permission, preferably for controlled portraits after play.

Where should you stand?

Start behind the back glass, then try the back corner and side glass. Elevated viewpoints can show court geometry. Never block a lateral access point.

Can you photograph padel with a phone?

Yes. Clean the lens, use optical zoom where available, place the phone close to the glass, shield reflections and use burst or live-photo mode for action.

Which Spanish destination is best for padel photography?

Marbella and the Costa del Sol work well for resort and coastal imagery. Barcelona and Madrid provide stronger urban stories, while Mallorca combines padel with island scenery.

Final thoughts

Glass is both the problem and the opportunity in padel photography. It can lower contrast, confuse autofocus and fill the frame with unwanted reflections. It can also create depth, symmetry and layered images that make padel look different from every other racket sport.

Control the glass first: use a clean pane, keep the lens close, block stray light and choose your angle carefully. Then let the enclosure become part of the story. Photograph the defender waiting for the rebound, the attacking pair beyond the net, and the Spanish sky reflected faintly across the pane.

The best padel photograph should not simply show a player hitting a ball. It should explain why photographing padel through glass feels different.
September 3, 2026 0 comments
0 FacebookTwitterPinterestEmail
Tips and Techniques

How to Take Better Photos With an iPhone

by Mark Bailey July 12, 2026
written by Mark Bailey
The best iPhone photos usually do not come from secret settings. They come from clean light, steady hands, careful framing and knowing when to use the camera features already built into your phone. Modern iPhones can handle portraits, low light, close-ups, action, travel scenes and everyday snapshots extremely well, but the camera still needs direction from the person holding it.This guide explains how to take better photos with an iPhone, whether you are photographing family, food, pets, holidays, products, landscapes or social content. Some features, such as Night mode, Macro, Photographic Styles, ProRAW and Camera Control, are only available on supported iPhone models, so check your own Camera settings before assuming every option will appear.

Quick answer: how do you take better iPhone photos?

To take better iPhone photos, clean the lens, turn on the grid and level, use natural light where possible, tap to focus, adjust exposure before shooting, avoid unnecessary digital zoom, and choose the right mode for the subject. Use Portrait mode for people, Night mode for low light, Burst mode for action and Macro mode for close details on supported models.

Apple’s iPhone camera tools guide explains that you can manually adjust focus and exposure, use a timer, change aspect ratio, and turn on the grid and level to help compose and straighten shots.

Best iPhone camera settings to start with

Setting or tool Best use Simple recommendation
Grid and Level Straighter horizons and better composition Turn both on in Settings > Camera.
Tap to focus Portraits, food, products and close subjects Tap the main subject before taking the photo.
Exposure control Bright skies, windows, sunsets and backlit scenes Drag exposure slightly down to protect highlights.
Portrait mode People, pets and objects with background blur Use when the subject is clearly separated from the background.
Night mode Low-light scenes Hold still or use a tripod for cleaner results.
Burst mode Children, pets, sport and movement Use short bursts, then keep only the best frame.
Macro mode Flowers, food, textures and small details Move close, then back up slightly if the image looks soft.
ProRAW High-quality editing on supported Pro models Use selectively because file sizes are much larger.

1. Clean the lens before you shoot

This is the simplest iPhone photography tip and one of the most important. Your phone spends the day in pockets, bags, hands and on tables, so the camera lens easily picks up fingerprints, dust and grease. A smudged lens can make photos look hazy, soft or low contrast.

Before important photos, wipe the lens gently with a clean microfibre cloth. Avoid using clothing with grit on it, as that can mark the lens cover. On some supported models, iPhone can also detect lens smudges and suggest cleaning the lens; Apple describes this in its advanced camera settings guidance.

2. Turn on the grid and level

The grid helps you compose more deliberately, and the level helps stop horizons, buildings and tables from tilting by accident. To turn them on, go to Settings > Camera, then enable Grid and Level.

Use the grid to place your subject slightly off-centre, line up doorways or windows, and keep vertical lines tidy in architecture shots. Use the level when photographing landscapes, flat lays, food, artwork, documents or anything where straight lines matter.

3. Use light before you use settings

Light matters more than any camera mode. If the light is poor, the iPhone has to work harder, and the image may show noise, motion blur, harsh shadows or washed-out highlights.

For portraits, food and product photos, soft side light from a window often works better than direct overhead light. For outdoor portraits, early morning and late afternoon usually give more flattering light than midday sun. On a bright day, move people into open shade rather than asking them to squint into the sun.

Avoid mixing too many light sources. A photo lit by daylight, ceiling bulbs and coloured LED lights can be difficult to edit because each light has a different colour.

4. Tap to focus and adjust exposure

The iPhone camera automatically focuses and exposes the scene, but it does not always know what you care about. Tap the subject to move focus where you want it. Then drag the exposure control up or down if the photo looks too bright or too dark.

This is especially useful when photographing:

  • Faces against a bright window
  • Sunsets and skies
  • Food on a dark table
  • Products on white backgrounds
  • Pets with dark fur
  • Stage or concert lighting

A small exposure reduction often improves skies, white clothing and bright backgrounds. It is easier to brighten shadows later than to recover a completely blown-out highlight.

5. Move your feet before you zoom

Zoom is useful, but it should not be your first solution. If you can safely move closer, do that before relying on heavy zoom. On iPhones with multiple cameras, the built-in lens options can give you wide, standard and telephoto perspectives, depending on model.

Use wider views for landscapes, interiors and groups. Use the standard camera for most everyday photos. Use a telephoto option, where available, for portraits, details and distant subjects. Be careful with heavy digital zoom because it can reduce detail and make the photo look over-processed.

6. Use Portrait mode with restraint

Portrait mode can make people, pets and objects stand out by softening the background. Apple’s Portrait mode guidance explains that supported iPhones capture depth information, and some photos taken in Photo mode can have portrait effects applied later when the depth button appears.

Portrait mode works best when the subject has clear edges and is separated from the background. It can struggle with hair, glasses, fingers, plants, fur and complex outlines. Take one Portrait mode photo, then take a normal Photo mode version as a backup.

For stronger portraits, place the subject near a window, turn their face slightly towards the light, and keep the background simple. Good light will do more for the portrait than maximum blur.

7. Hold still for Night mode

Night mode automatically brightens low-light photos on supported iPhone models. Apple’s Night mode guide explains that the iPhone sets the exposure time automatically, but you can adjust it manually, and a tripod can help capture more detail.

For better Night mode photos:

  • Hold the iPhone as still as possible.
  • Brace your elbows against your body.
  • Rest the phone on a wall, table or tripod for longer exposures.
  • Tap the main subject to focus.
  • Reduce exposure slightly if lights are blowing out.
  • Ask people to stay still until the capture finishes.

Night mode is excellent for streets, buildings, interiors and quiet scenes. It is less effective for fast-moving people, pets or vehicles because the longer exposure can blur movement.

8. Use Burst mode for action

When photographing children, pets, sport or anything unpredictable, one tap may miss the best moment. Apple’s Burst mode guidance explains that Burst mode captures multiple high-speed photos so you can choose the best frame afterwards.

Use Burst mode for:

  • Children running or jumping
  • Dogs catching a ball
  • Sport and fitness shots
  • Street scenes with movement
  • Group photos where someone may blink

Do not keep every frame. After the burst, select the strongest photo and delete the rest. This keeps your library manageable and makes it easier to find good images later.

9. Try Macro mode for close-up detail

On supported models, Apple says the iPhone uses the Ultra Wide camera for macro photography and can focus as close as 2 centimetres from the subject. See Apple’s macro photography guidance.

Macro works well for flowers, insects, food textures, jewellery, fabric, handwriting, leaves, shells and small product details. The closer you get, the more important steadiness and light become.

If the image looks blurry, back up slightly or tap the subject. Do not block your own light with the phone. For food or product close-ups, try moving the subject near a window and turning off harsh overhead lighting.

10. Use Photographic Styles before filters

Photographic Styles let you customise the look of photos on supported models. Apple’s Photographic Styles guide explains that you can select a style and refine it later in the Photos app on supported models.

Use styles carefully. A warm, high-contrast look may flatter summer portraits but make food look too orange. A cool style may suit city architecture but make skin look dull. If you are unsure, use Standard or keep the style subtle.

For a consistent Instagram, blog or business look, choose one style and test it in daylight, shade, indoors and at night before using it on every important photo.

11. Use ProRAW only when you need editing flexibility

Apple ProRAW gives supported iPhone Pro models more editing flexibility by retaining more image information. Apple’s ProRAW guidance notes that ProRAW photos have larger file sizes, and supported Pro models can offer 12 MP, 48 MP or HEIF 48 MP options depending on device.

Use ProRAW for:

  • Important landscapes
  • Travel photos you want to edit later
  • High-contrast scenes
  • Product photography
  • Photos intended for large prints

Do not leave ProRAW on for everything unless you need it. The files can quickly fill storage. For everyday snapshots, HEIF or JPEG is usually more practical.

12. Compose with a clear subject

Many weak phone photos fail because there is no clear subject. Before taking the picture, ask: what is this photo about? A person, a plate of food, a doorway, a dog, a skyline, a coffee cup, a sunset, a detail?

Once you know the subject, remove distractions from the frame. Move closer. Change angle. Wait for a person to walk out of the background. Tilt the phone slightly or step sideways. Small movements can turn a cluttered snapshot into a cleaner photograph.

Use foreground, background and negative space deliberately. A doorway can frame a person. A table edge can lead towards food. Empty sky can make a silhouette stronger. Good composition is often the art of leaving things out.

13. Take better food photos with window light

Food often looks best in soft natural light from the side. Place the dish near a window, turn off yellow ceiling lights and avoid using the flash. Tap the food to focus, then reduce exposure slightly if white plates or shiny sauces look too bright.

For flat lays, turn on the level and shoot from directly above. For burgers, cakes, drinks and layered dishes, shoot from the side or at a 45-degree angle so the height and texture are visible.

Add context, but keep it controlled: a fork, napkin, glass, hand, ingredient or chopping board can help. Too many props make the photo feel crowded.

14. Take better travel and landscape photos

For landscapes, use the grid and level, avoid tilted horizons and include a foreground element when possible. A person, rock, path, wall or café table can give the scene scale.

Do not take only wide views. A strong travel set includes:

  • Wide landscapes
  • Street scenes
  • People and portraits
  • Food and drink
  • Details such as signs, tiles, doors or textures
  • Night scenes
  • One quiet moment that feels personal

Use Pano mode for wide scenes when one frame is not enough. Apple’s Pano mode guidance recommends panning slowly and keeping the arrow on the centre line.

15. Take better selfies and group photos

For selfies, look for clean light first. Face a window, stand in open shade or turn so the strongest light is not directly overhead. Hold the phone slightly above eye level, but not so high that the angle looks unnatural.

For group photos, use the timer so everyone can settle before the shot. Apple’s camera tools include 3-second, 5-second and 10-second timer options. Put the phone on a stable surface or tripod, tap the group to focus, and take several versions because someone will almost always blink.

16. Edit lightly in the Photos app

The best edit improves the photo without making it look fake. Apple’s Photos editing guidance explains that you can adjust photos and videos, crop or rotate them, apply filters, edit Photographic Styles on supported models, and copy edits to other photos.

A simple editing order is:

  1. Straighten the horizon.
  2. Crop out distractions.
  3. Adjust exposure and brilliance.
  4. Reduce highlights if bright areas are harsh.
  5. Lift shadows only if needed.
  6. Adjust warmth if the colour feels too yellow or too blue.
  7. Add a little definition or sharpness, but avoid overdoing it.

Avoid heavy filters on skin, food and skies. Over-edited iPhone photos often look crunchy, orange, grey or unnaturally smooth.

17. Save camera settings you use often

If you often use the same mode or settings, Preserve Settings can stop Camera from resetting every time you open it. Apple’s Preserve Settings guidance says you can save options such as the last camera mode, Photographic Style, Macro Control, Exposure Adjustment, Night mode, ProRAW and Live Photo depending on model.

This is useful if you regularly shoot in Portrait mode, keep Live Photo off, preserve exposure adjustment, or want ProRAW controls available on supported models.

18. Know when to use Live Photos

Live Photos capture a brief moment before and after the still image, including audio. Apple’s Live Photos guidance explains how they work in the Camera app.

Live Photos are useful for children, pets, laughter, movement, waterfalls, candles and any moment where the best frame may happen just before or after you tap the shutter. They are less useful when you want the smallest file size or need a clean still image for professional use.

Common iPhone photography mistakes

  • Not cleaning the lens: the photo looks soft before you even start.
  • Using flash too often: direct flash can flatten faces and make food look harsh.
  • Standing too far away: the subject gets lost in the frame.
  • Overusing digital zoom: detail can fall apart quickly.
  • Ignoring the background: bins, signs and clutter distract from the subject.
  • Over-editing: too much clarity, saturation or smoothing makes images look artificial.
  • Using Portrait mode for everything: fake blur can fail around hair, glasses and objects.
  • Forgetting to back up photos: good images are easy to lose if they only live on one phone.

Simple iPhone photo checklist

  • Clean the lens.
  • Turn on Grid and Level.
  • Find the best available light.
  • Choose the right lens or camera option.
  • Move closer before zooming heavily.
  • Tap the subject to focus.
  • Adjust exposure before shooting.
  • Check the background.
  • Take more than one frame.
  • Edit lightly and back up the final image.

Frequently asked questions

What is the best iPhone camera setting for everyday photos?

Use Photo mode with Grid and Level turned on, tap to focus, and adjust exposure if the scene is too bright or too dark. For most everyday photos, this matters more than using advanced formats.

Should I use Portrait mode or normal Photo mode?

Use Portrait mode when you want a person, pet or object to stand out from the background. Use normal Photo mode when edges are complex, several people are in the frame, or you want a more natural documentary look.

How do I stop iPhone photos looking too bright?

Tap the subject, then drag the exposure control slightly down before taking the photo. This is especially useful for skies, windows, beaches, snow, white clothing and bright plates.

Is ProRAW worth using?

ProRAW is worth using on supported Pro models when you want maximum editing flexibility for important photos. It is usually unnecessary for everyday snapshots because the files are much larger.

How do I take sharper iPhone photos at night?

Use Night mode on supported models, hold the iPhone still, brace your elbows, rest the phone on a stable surface if possible, and ask people to stay still until the capture finishes.

Can iPhone photos be good enough for a website or blog?

Yes. Good light, clean composition, original images and careful editing can make iPhone photos strong enough for blogs, small business websites and social media. Use the correct image size and add descriptive alt text when publishing online.

Final thoughts

Taking better iPhone photos is mostly about slowing down. Clean the lens, check the light, choose the right position, tap to focus, adjust exposure and look at the background before pressing the shutter.

Use the iPhone’s camera features when they solve a real problem: Night mode for low light, Portrait mode for subject separation, Burst mode for movement, Macro for close details and ProRAW for serious editing. The phone can do a lot, but the strongest photographs still come from seeing clearly before you shoot.

July 12, 2026 0 comments
0 FacebookTwitterPinterestEmail
AdviceTips and Techniques

What You Should Do With Your Old Printed Photographs

by Mark Bailey June 12, 2026
written by Mark Bailey

What to Do With Old Printed Photographs

Old printed photographs have a way of appearing when you least expect them: in a shoebox at the back of a cupboard, tucked inside an album, mixed into a drawer, or passed on after a house move or family clear-out. At first, they can feel like clutter. Then you start looking properly and realise they may be the only record of certain people, places, holidays, homes and family stories.

The best thing to do with old photographs is to sort them carefully, digitise the important ones, record what you know about them, store the originals safely and display copies rather than risking damage to the most valuable prints. You do not need to finish everything in one weekend. A simple system is enough to turn a pile of old photos into a usable family archive.

The Library of Congress guidance on caring for photographs recommends a cool, relatively dry and stable environment for photographic materials. The U.S. National Archives family archive guidance also recommends acid-free paper enclosures or stable plastic sleeves such as polyester, polypropylene or polyethylene for family papers and photographs.

Quick guide: what to do with old printed photos

Task What to do Why it matters
Sort Separate photos into keep, scan, investigate, display and discard piles. Makes the collection manageable.
Digitise Scan important photos or use a good photo-scanning app. Creates a backup and makes sharing easier.
Restore Use digital restoration for damaged scans or consult a conservator for fragile originals. Improves access without risking the original.
Identify Ask relatives about people, places, dates and events. Preserves the story behind the image.
Label Add names, dates and locations to digital file names or metadata. Helps future generations understand the collection.
Store Use photo-safe sleeves, albums or boxes in a cool, dry, dark place. Slows deterioration and protects the prints.
Display Frame copies where possible and keep originals safely stored. Lets you enjoy the photos without exposing originals to light and handling.

1. Sort the photographs before you do anything else

Start by sorting the photos into broad groups. Do not worry about perfect chronology at this stage. The first aim is to reduce the chaos.

  • Keep: meaningful photos of family, friends, places, events or important memories.
  • Scan first: fragile, rare or sentimental photographs that should be digitised as a priority.
  • Investigate: unknown people, places or dates that may need family research.
  • Display: images you may want to frame, turn into gifts or use in albums.
  • Discard: duplicates, badly blurred images, accidental shots or photos with no value to you.

Be careful before throwing away unidentified photographs. A face you do not recognise may still matter to another family member. If you are unsure, put the photo in the “investigate” pile and ask around before discarding it.

2. Remove duplicates and poor-quality prints

Most old photo collections contain duplicates, near-duplicates, blurred prints, dark exposures, cut-off heads, random landscapes and mystery images that no one can explain. It is fine to reduce the collection if the photo has no sentimental, historical or practical value.

A useful rule is to keep the best version of repeated images. If you have five similar photos from the same birthday party, choose the one with the clearest faces and strongest memory. If a blurry image is the only photo of a person or place, keep it. Technical quality is not the only measure of value.

Do not rush this step when dealing with inherited photographs. What looks unimportant today may become meaningful once someone identifies the people or location.

3. Digitise the important photographs

Printed photographs can fade, tear, stick together, suffer water damage or become separated from their story. Digitising gives you a backup and makes it easier to share photos with relatives.

A flatbed scanner usually gives the best control for important prints. Scan at a high enough resolution for future use: 300 dpi is usually adequate for simple sharing, while 600 dpi is a better starting point for archiving, restoration or reprinting. Save a high-quality master file and then make smaller JPEG copies for email, messaging or social sharing.

If you do not have a scanner, a phone-scanning app can still be useful. Choose bright, even light, avoid glare, keep the phone parallel to the photo and check that faces are sharp before moving on. Phone scans may not match a good flatbed scanner, but they are far better than leaving important photographs in a forgotten box.

4. Back up the digital copies properly

Scanning is only useful if the files are protected. Do not keep the only digital copies on one laptop or phone.

Use a simple three-copy approach:

  • Keep one copy on your main computer.
  • Keep one copy on an external hard drive or USB drive.
  • Keep one copy in secure cloud storage.

Organise files with clear folder names, such as Family Photos > 1970s > Weddings or Grandparents > House and Garden. Use descriptive filenames where possible, such as 1984-mum-dad-brighton-pier.jpg rather than IMG_0047.jpg.

5. Restore damaged photos digitally

If a photograph is scratched, faded, torn or stained, a digital copy can often be improved without touching the original. Digital restoration can adjust colour, contrast, exposure, scratches, tears and small missing areas.

For ordinary family prints, photo-editing software or a reputable restoration service may be enough. For rare, fragile or historically important originals, avoid home experiments. The National Archives general preservation guidance warns against using heat, water or solvents on photographs because they can cause permanent damage.

There is an important difference between digital restoration and physical conservation. Digital restoration improves a scan. Physical conservation treats the original object. If the original is flaking, stuck to glass, mouldy, torn or unusually valuable, speak to a qualified conservator before attempting repairs.

6. Ask relatives for names, dates and stories

The most valuable part of an old photograph is often the information around it: who is in the picture, where it was taken, what year it was, and why the moment mattered.

Older relatives are usually the best starting point. Show them a small batch of photos rather than a huge pile. Ask specific questions:

  • Who is in this photo?
  • Where was it taken?
  • Roughly what year or decade is it?
  • What was happening that day?
  • Who else might know more?
  • Are there any family names, nicknames or places we should record?

Record stories while people are available to tell them. A photograph labelled “Nan in garden, 1962, first house in Leeds” is far more useful than an unidentified image in a box.

7. Use clues inside the image

If no one recognises a photograph, study the image itself. Clothing, hairstyles, cars, shopfronts, road signs, wallpaper, furniture, school uniforms and landmarks can all help narrow down the date or location.

Look at the back of the print too. There may be handwritten notes, studio stamps, processing dates or old album captions. Handle the photo carefully and do not write directly on the image surface.

If you share mystery photos online, be thoughtful about privacy. Avoid posting sensitive family images publicly without considering who is shown and whether living relatives may object.

8. Label photographs and digital files clearly

Labelling is what turns a pile of images into a family archive. For digital files, add information to the file name, folder name or metadata. For physical prints, avoid writing heavily on the back with ordinary pens, as ink can bleed or transfer.

A simple digital file naming system might include:

  • Year or approximate decade
  • Names of people
  • Place
  • Event

Example: 1978-auntie-maureen-blackpool-holiday.jpg. If you are unsure, use wording such as c1970s or unknown-wedding-likely-yorkshire.jpg rather than inventing certainty.

9. Store the original prints safely

Once you have sorted and scanned the photos, store the originals in a way that protects them from light, damp, heat, dust and handling.

Use photo-safe albums, acid-free paper enclosures, or stable plastic sleeves made from polyester, polypropylene or polyethylene. Avoid sticky “magnetic” albums, ordinary envelopes, rubber bands, paper clips and plastic sleeves that are not designed for photograph storage.

Store boxes or albums in a cool, dry, dark and stable place. Avoid lofts, garages, sheds, window ledges and damp cupboards. Large changes in temperature and humidity can damage photographic materials over time.

10. Display copies rather than precious originals

It is natural to want to display favourite family photographs. The safest approach is to display a copy and keep the original stored. The National Archives notes that colour scans and colour photocopies can make good display copies, while originals can remain protected.

If you do display an original, keep it away from direct sunlight, damp walls, kitchens, bathrooms and fireplaces. Use a suitable frame, photo-safe mount and UV-filtering glazing where possible.

For meaningful displays, try grouping photos by story rather than scattering them randomly. You might create a wedding wall, a grandparent gallery, a “homes we lived in” frame, or a small album for each branch of the family.

11. Turn selected photos into gifts or keepsakes

Once important photos have been scanned, you can use copies creatively without risking the originals.

  • Create a family photo book.
  • Make a framed collage for a birthday or anniversary.
  • Print a restored portrait for a relative.
  • Create a memory box with copies, labels and notes.
  • Use scanned images in a family history project.
  • Make calendars, cards or keepsake prints.

Be careful with very personal images. Not every old photograph is suitable for public display, social media or novelty gifts. When in doubt, keep the image private or ask the people involved.

12. Create a simple family photo archive

The most useful outcome is not a perfect archive. It is a system that someone else can understand.

For physical photographs, organise by person, family branch, decade, place or event. For digital copies, mirror the same structure in folders. Keep a simple notes document that explains uncertain dates, family nicknames, maiden names, addresses and who helped identify each image.

A basic archive might include:

  • One box for original prints
  • One album for display copies
  • One digital folder for high-resolution scans
  • One shared folder for smaller copies
  • One notes file with names, places and unresolved questions

Frequently asked questions

Should I throw away old photographs?

You can discard duplicates, accidental shots and images with no personal or historical value, but pause before throwing away unidentified people, old places or inherited family photos. Someone else may be able to identify them.

What is the best way to digitise old photos?

A flatbed scanner usually gives the best result for important prints. Scan at 300 dpi for basic sharing or 600 dpi for archiving and future restoration. A phone-scanning app is a useful alternative when a scanner is not available.

Can damaged photographs be restored?

Many damaged photographs can be improved digitally after scanning. Fragile or valuable originals should be assessed by a qualified conservator rather than repaired at home.

Where should old printed photographs be stored?

Store photographs in photo-safe sleeves, albums or boxes in a cool, dry, dark and stable place. Avoid lofts, garages, sheds, damp cupboards and areas exposed to direct sunlight.

Is it better to display originals or copies?

Display copies where possible and keep the originals safely stored. This lets you enjoy the images while reducing damage from light, handling and environmental changes.

Final thoughts

Old printed photographs are more than clutter from another era. They are evidence of people, places and moments that may otherwise disappear from family memory.

Start small. Sort one box, scan the most important images, ask relatives what they know, label the files and store the originals safely. You do not have to preserve every print, but the photographs that matter deserve more than being left in a drawer.

June 12, 2026 0 comments
0 FacebookTwitterPinterestEmail
AdviceTips and Techniques

Phone Camera Settings Explained for Beginners

by Mark Bailey March 12, 2026
written by Mark Bailey
Phone cameras are powerful, but the settings can feel confusing when you first start using them properly. Focus, exposure, HDR, Night mode, Portrait mode, Pro mode, RAW, grid lines, aspect ratio and resolution all sound technical until you understand what each one actually does.The good news is that you do not need to change every setting to take better photos. Most of the time, your phone’s standard Photo mode is the right starting point. The important skill is knowing which setting solves which problem: exposure for brightness, focus for sharpness, grid lines for composition, Night mode for low light, Burst or Motion mode for action, and RAW or Pro mode for advanced editing.

This beginner guide explains the most useful phone camera settings in plain English. It applies to iPhone, Samsung Galaxy, Google Pixel and most modern Android phones, although the exact names and menus vary by model and software version.

Quick answer: which phone camera settings matter most?

The most useful phone camera settings for beginners are grid lines, focus, exposure, lens or zoom choice, flash, Night mode, Portrait mode, Burst or Motion mode, timer, aspect ratio, resolution and file format. Start with Auto or Photo mode, then adjust only the setting that solves the problem in front of you.

Setting What it controls When to use it
Grid and level Composition and straight lines Landscapes, food, architecture, flat lays and horizons
Focus What part of the photo is sharp Portraits, food, pets, products and close-ups
Exposure Brightness Bright skies, windows, sunsets, dark rooms and backlit subjects
Zoom or lens choice How wide or close the photo appears Groups, portraits, landscapes, details and distant subjects
Flash A burst of extra light Use sparingly; often better replaced with natural or continuous light
Night mode Low-light capture Evening streets, interiors, city lights and still scenes
Portrait mode Background blur and subject separation People, pets and objects with clear edges
Burst or Motion mode Fast sequences Children, pets, sport and group photos
RAW or ProRAW More editing flexibility Important photos you plan to edit carefully
Pro or Manual mode ISO, shutter speed, white balance and focus Advanced control when Auto mode is not giving the result you want

1. Photo mode or Auto mode

Photo mode, sometimes called Auto mode, is the default camera mode on most phones. It automatically chooses focus, exposure, colour processing, noise reduction and other image adjustments. For beginners, this is where you should start.

Auto mode is best for everyday photos: family moments, meals, pets, holidays, quick portraits, scenery and social media shots. It is fast, reliable and designed to handle changing conditions without you needing to think about every technical setting.

The mistake is not using Auto mode. The mistake is assuming Auto mode always knows your intention. It may focus on the wrong subject, make a bright sky too white, lift shadows too much, or choose a slower shutter speed than you wanted. That is when the next two controls matter: focus and exposure.

2. Focus: what should be sharp?

Focus decides which part of your photo appears sharp. Most phones focus automatically, but you can usually tap the screen to tell the camera what matters.

On iPhone, Apple explains that the camera automatically sets focus and exposure, but you can tap the screen to move the focus area and then adjust exposure beside it. See Apple’s guide to iPhone camera tools. On Pixel, Google says you can tap the subject to focus, and on supported models you can lock focus and exposure on a moving subject. See Google’s Pixel camera photo guidance.

Use tap-to-focus when photographing:

  • A person’s face
  • A plate of food
  • A product on a table
  • A pet or child
  • A flower or close-up detail
  • A subject behind glass or a fence

If your subject is moving and your phone supports focus lock or tracking, use it carefully. If the camera keeps choosing the wrong face or object, tap again or move closer so the subject is clearer.

3. Exposure: how bright should the photo be?

Exposure controls brightness. If a photo looks washed out, too dark, or dominated by a bright window or sky, exposure is the setting to adjust.

Most phones let you tap the subject and then slide brightness up or down. On iPhone, this appears as an exposure control next to the focus area. On many Android phones, you will see a sun icon, brightness slider or exposure value control.

Lower exposure slightly when photographing:

  • Sunsets
  • Bright skies
  • Beach scenes
  • Snow
  • White clothing
  • Food on white plates
  • People standing in front of windows

Raise exposure slightly when the subject is too dark, but do not lift it so much that highlights turn pure white. In many cases, it is better to protect the bright areas and brighten shadows gently when editing.

4. Grid lines and level

Grid lines help you compose the photo. A level helps keep horizons, buildings, tables and flat lays straight. These are two of the best beginner settings because they improve almost every type of photo without changing image quality.

On iPhone, turn them on in Settings > Camera, then enable Grid and Level. Samsung’s camera guidance also explains that Galaxy phones can use grid lines to help with the rule of thirds and composition. See Samsung’s Galaxy camera modes and settings guide.

Use grid lines to:

  • Keep horizons straight
  • Place a person slightly off-centre
  • Line up doors, windows and buildings
  • Keep food flat lays tidy
  • Balance sky, subject and foreground

A straight photo often looks more professional before you edit anything else.

5. Zoom and lens choice

Your phone may have several camera options, such as ultra wide, wide and telephoto. These are often shown as numbers like 0.5x, 1x, 2x, 3x or 5x. The exact options depend on your phone.

Lens or zoom option Best for Beginner tip
0.5x ultra wide Landscapes, interiors, large buildings and group photos Keep people away from the edges to avoid distortion.
1x main camera Everyday photos, food, people, travel and products Use this as your default.
2x or 3x telephoto Portraits, details, pets and less distorted close-ups Great for natural-looking portraits if available.
5x or longer telephoto Distant details, stages, architecture and wildlife-style shots Hold steady because shake is more obvious when zoomed in.
Digital zoom Emergency use when you cannot move closer Avoid heavy digital zoom if image quality matters.

The best beginner rule is simple: move your feet before using heavy digital zoom. If you can safely step closer, do that. Digital zoom can reduce detail and make photos look overprocessed.

6. Flash: when should you turn it on?

Phone flash is useful in a few situations, but it often makes photos look harsh. Direct flash can flatten faces, create shiny skin, ruin food photos and produce hard shadows.

Leave flash off for most portraits, food, concerts, restaurants and reflective surfaces. Use window light, lamps or Night mode instead. Turn flash on only when you need a quick record photo in darkness, such as a document, object, label or close subject where image mood does not matter.

If your phone has Auto Flash, do not assume it always makes the right choice. Check the flash icon before taking photos in restaurants, museums, events or sports settings where flash may be distracting or prohibited.

7. HDR, Scene Optimizer and smart processing

HDR and scene-processing tools help your phone balance bright and dark areas. They can be useful for landscapes, backlit portraits, interiors with windows and high-contrast scenes.

The names vary. iPhone uses computational processing across the Camera app, and some models include settings such as Scene Detection, Lens Correction and resolution controls in Camera settings. Apple’s advanced iPhone camera settings explain options such as default resolution, Lens Correction and Scene Detection on supported models. Samsung’s Scene Optimizer can adjust exposure, contrast, white balance and more based on what is detected in the frame.

Keep smart processing on when you want quick, pleasing everyday photos. Turn it down or off, where your phone allows it, if the image looks too processed, too bright, too sharp or too colourful.

8. Night mode

Night mode is designed for low light. It usually takes a longer exposure or combines multiple frames so the photo appears brighter and cleaner than a normal dark image.

Apple says Night mode automatically brightens photos and captures more detail in low light on supported iPhone models, and recommends holding the iPhone still while the shot is taken. See Apple’s Night mode guidance. Google’s Pixel Camera help also explains that Night Sight is used for low-light photos on Pixel devices. See Google’s Pixel Night Sight guidance.

Use Night mode for:

  • Evening streets
  • City lights
  • Dim interiors
  • Still portraits in low light
  • Restaurants and cafés where flash would look harsh

Hold the phone steady, brace your elbows, or rest the phone on a wall, table or small tripod. Night mode is less effective for fast-moving people, pets or vehicles because movement can blur during the longer capture.

Phone camera Night mode example showing a low-light street scene with balanced highlights
A useful Night mode image should show how steady holding improves sharpness in low light.

9. Portrait mode and depth control

Portrait mode creates background blur so the subject stands out. It works best when the subject has clear edges and is separated from the background.

Use Portrait mode for:

  • People
  • Pets
  • Products
  • Flowers
  • Objects on a table

Portrait mode can struggle with hair, glasses, fingers, fur, leaves and complex edges. Take a normal Photo mode version as a backup. On supported iPhones, Apple says some photos taken in Photo mode capture depth information when the Depth button appears, allowing portrait effects to be applied later. See Apple’s Portrait mode guidance.

10. Macro mode

Macro mode is for close-up photos. It helps with small subjects such as flowers, jewellery, insects, food textures, handwriting, fabrics and product details. On phones that support macro capture, the camera may switch to a close-focusing lens automatically.

Use Macro mode when you want to show texture or tiny detail. Keep the phone steady, avoid blocking your own light and tap the part that needs to be sharp. If the image looks soft, move back slightly. Being too close can make focus harder, even in Macro mode.

11. Burst, Motion Photo, Live Photo and Top Shot

These features help with movement and moments where timing is difficult. The names differ by phone.

  • Burst mode: captures multiple photos quickly so you can choose the best frame.
  • Live Photo: records a short moment before and after an iPhone still photo.
  • Motion Photo: Samsung’s version of a short motion capture around a photo.
  • Top Shot: Pixel can help choose better frames from a motion capture on supported models.

Apple says Burst mode is useful for moving subjects or when you want several high-speed photos to choose from. See Apple’s Burst mode guidance. Google’s Pixel Top Shot guidance explains that Top Shot needs to be turned on in Google Camera.

Use these modes for children, pets, sport, jumping shots, laughter, group photos and unpredictable action. After the shot, select the best frame and delete the weak ones so your gallery does not become impossible to manage.

12. Timer

The timer gives you a short delay before the photo is taken. It is useful for selfies, group photos, night shots, tripod photos and situations where pressing the shutter would shake the phone.

Use a 3-second timer when the phone is on a tripod or table and you simply want to avoid shake. Use a 10-second timer when you need time to join a group photo.

13. Aspect ratio

Aspect ratio controls the shape of the photo. Common options include 4:3, 1:1, 16:9 and sometimes full-screen.

Aspect ratio Best for Beginner advice
4:3 Most photos and maximum flexibility Use this as the safest default.
1:1 Square social posts, products and profile-style images Good when you already know you need a square image.
16:9 Wide landscapes, screens and video-style framing Looks cinematic, but may crop useful image area.
Full screen Phone wallpaper or vertical social content Useful for phone display, less flexible for printing.

For beginners, 4:3 is usually the best default because it preserves more of the camera’s frame and gives you more cropping options later.

14. Resolution, megapixels and file size

Resolution controls how much detail the image can hold. Higher megapixel settings can be useful for cropping, printing or detailed editing, but they also create larger files.

On supported iPhones, Apple says you can change the Main camera default resolution from 24 MP to 12 MP, and that 48 MP capture requires Resolution Control or ProRAW and Resolution Control depending on model. See Apple’s advanced camera settings.

For everyday photos, the default resolution is usually fine. Use higher resolution for:

  • Travel landscapes
  • Product photos
  • Photos you may print large
  • Images where you may crop heavily later

Avoid using the highest resolution all the time if you are short on storage or mostly share images by messaging apps and social media.

15. HEIF, JPEG, RAW and ProRAW

File format affects quality, compatibility, editing flexibility and storage.

Format What it means Best for
JPEG Widely compatible compressed image file Sharing, websites, older devices and simple workflows
HEIF / HEIC Efficient modern format with smaller file sizes Everyday phone use where compatibility is not a problem
RAW Less processed file with more editing flexibility Advanced editing and important images
Apple ProRAW Apple’s RAW-style format with iPhone image processing Supported iPhone Pro models when you need more editing control

Apple says ProRAW combines standard RAW information with iPhone image processing to give more control when adjusting exposure, colour and white balance, but ProRAW files are larger. See Apple’s ProRAW guidance. On supported Pixel models, Google also provides RAW/JPEG options and Pro Controls. See Google’s Pixel Pro Controls guide.

Beginners should not feel pressured to shoot RAW. Use JPEG or HEIF for everyday photos. Use RAW or ProRAW only when you plan to edit seriously and have enough storage.

16. Pro mode or Manual mode

Pro mode gives you manual control over settings the phone usually chooses automatically. Samsung says Galaxy Pro mode can manually adjust ISO, exposure value, white balance and colour tone, while Pro video can adjust video and microphone options. Pixel Pro Controls on supported models include focus control, shutter speed and ISO.

The main Pro mode settings are:

Pro setting Plain-English meaning Beginner tip
ISO How sensitive the camera is to light Lower ISO looks cleaner; higher ISO helps in darker scenes but adds noise.
Shutter speed How long the camera captures light Fast shutter freezes movement; slow shutter can blur motion.
White balance How warm or cool the colours look Adjust if indoor photos look too yellow or too blue.
Manual focus Lets you choose focus distance yourself Useful for close-ups, glass, low light and scenes where autofocus struggles.
Exposure value / EV Quick brightness adjustment Use negative EV to protect skies and bright backgrounds.

Start with Auto mode first. Move to Pro mode when you can name the problem: movement blur, noisy low-light image, wrong colour, wrong focus or over-bright highlights.

17. Video settings beginners should understand

Even if your article or social post is mainly about photos, phone camera settings often include video options. The most useful beginner video settings are resolution, frame rate, stabilisation and audio.

  • 1080p: good for everyday video and smaller files.
  • 4K: sharper and better for cropping or editing, but larger files.
  • 30 fps: natural for general video.
  • 60 fps: smoother movement, useful for sport, pets and action.
  • Stabilisation: helps reduce shaky handheld footage.
  • Audio: matters more than beginners expect, especially for interviews or cooking videos.

Use 4K only when you need it and have enough storage. For casual clips, 1080p is usually easier to store, upload and share.

18. Preserve settings and reset settings

Some phones reset camera settings every time you open the app. Others let you preserve your last-used camera mode, exposure adjustment, Live Photo or other preferences.

Apple’s Preserve Settings guidance explains that iPhone can save settings such as the last camera mode, depth, Live Photo, exposure adjustment and ProRAW controls depending on model. Samsung also includes a reset option in its Camera settings if you want to return to defaults.

Preserve settings if you regularly use the same setup. Reset settings if your camera app starts behaving strangely or you cannot work out which setting is causing a problem.

Best beginner settings by photo type

Photo type Suggested mode Settings to check
Everyday snapshots Photo / Auto Clean lens, tap focus, adjust exposure if needed.
Portraits Portrait or Photo Use soft light, tap the face, avoid busy backgrounds.
Food Photo or Food mode Use window light, turn flash off, tap the dish, reduce exposure slightly.
Landscapes Photo, Ultra Wide or Pano Turn on grid and level, keep horizon straight, avoid over-bright skies.
Low light Night mode / Night Sight Hold steady, brace the phone, use timer or tripod if needed.
Action Burst, Motion Photo, Top Shot or Photo Use good light, shoot several frames and keep the best one.
Products Photo, Portrait or Pro mode Use clean background, tap focus, control reflections and shoot in good light.
Documents Document scan or Photo Keep phone parallel, use even light and check sharpness.

Common beginner mistakes

  • Changing too many settings at once: adjust one setting and check the result.
  • Leaving flash on Auto: it may fire when you do not want it.
  • Using heavy digital zoom: move closer or use an optical lens option if available.
  • Ignoring exposure: bright skies and windows can ruin otherwise good photos.
  • Forgetting focus: tap the subject, especially for food, products and portraits.
  • Using Portrait mode for everything: edge blur can fail around hair, fur and glasses.
  • Shooting RAW all the time: large files can fill your storage quickly.
  • Not backing up photos: good images should not live only on one phone.

Beginner phone camera checklist

  • Clean the lens.
  • Turn on grid lines and level.
  • Start in Photo or Auto mode.
  • Choose the right lens or zoom option.
  • Tap your subject to focus.
  • Adjust exposure before taking the photo.
  • Turn flash off unless you genuinely need it.
  • Use Night mode only when the scene is still enough.
  • Use Burst or Motion mode for action.
  • Use RAW or Pro mode only when you plan to edit carefully.

Publishing phone photos on a blog or website

If you use phone photos on a blog, recipe site or business website, the camera settings are only part of the job. Export images at an appropriate size, compress them for web performance and use descriptive file names and alt text.

Google’s image SEO best practices recommend placing images near relevant text, using short descriptive filenames where possible, and writing useful alt text rather than stuffing the alt attribute with keywords.

A good filename is iphone-food-photo-window-light.jpg. A weak filename is IMG_3827.jpg. A good alt text example is “bowl of tomato pasta photographed beside a window with soft natural light.”

Frequently asked questions

What camera setting should beginners use most?

Start with Photo or Auto mode, then use tap-to-focus and exposure adjustment. Those two controls fix more beginner photo problems than advanced settings do.

Should I keep grid lines turned on?

Yes. Grid lines help with straight horizons, balanced composition and cleaner framing. They do not affect the final image quality.

Is Portrait mode better than normal Photo mode?

Portrait mode is better when you want background blur and the subject has clear edges. Normal Photo mode is better for groups, complex edges, fast movement and documentary-style images.

Should I shoot RAW on my phone?

Shoot RAW only when you need more editing flexibility and have enough storage. For everyday photos, JPEG or HEIF is usually more practical.

Why do my phone photos look blurry?

Common causes include a dirty lens, missed focus, low light, subject movement, camera shake or too much digital zoom. Clean the lens, tap to focus and use better light before changing advanced settings.

Why are my phone photos too bright?

The camera is probably exposing for a darker part of the scene. Tap the subject and drag exposure down slightly, especially when photographing skies, windows, white clothing or bright backgrounds.

What is the best phone camera setting for food photos?

Use Photo mode or Food mode if your phone has one. Turn flash off, use window light, tap the dish to focus, and reduce exposure slightly if plates or sauces look too bright.

What is the best phone camera setting for night photos?

Use Night mode or Night Sight on supported phones. Hold the phone steady, use a timer or tripod if needed, and avoid fast-moving subjects.

Final thoughts

Phone camera settings become easier when you stop treating them as a menu of technical features and start treating them as problem-solvers. Focus fixes sharpness. Exposure fixes brightness. Grid and level fix framing. Night mode fixes low light. Burst or Motion mode helps with action. RAW and Pro mode give more editing control when you need it.

For most beginners, the best setup is simple: clean the lens, turn on grid and level, use Photo mode, tap to focus, adjust exposure and avoid unnecessary digital zoom. Master those habits first. The advanced settings will make more sense once you know what problem you are trying to solve.

March 12, 2026 0 comments
0 FacebookTwitterPinterestEmail
Tips and Techniques

How to Choose the Right GoPro Accessories for Better Photos and Videos

by Mark Bailey February 14, 2026
written by Mark Bailey

A GoPro is built for action, travel and outdoor filming, but the camera alone is rarely enough to get the best shots. The right accessory can help you hold the camera steadier, mount it safely, keep it floating in water, extend battery life, record more footage or capture a point of view that would be impossible by hand.

The best GoPro accessory is not always the most expensive one. It is the one that matches what you actually film. A surfer needs different gear from a cyclist. A family on holiday needs a different setup from someone filming mountain biking, snorkelling, skiing or travel vlogs.This guide explains how to choose GoPro accessories by activity, what the main kits include, which extras are worth buying first, and what to check before spending money.

GoPro camera with travel accessories including grip, case, batteries and memory card
Use an original or properly licensed image. Do not reuse old web images unless you have permission.

Quick answer: which GoPro accessories should you buy first?

Most GoPro users should start with a grip or mini tripod, a spare battery, a fast microSD card, a protective case and one mount that suits their main activity. For water use, add a floating hand grip or Floaty. For cycling, skiing or paddling, choose a chest mount or handlebar/pole mount. For travel, a small tripod grip and compact case are usually more useful than a large bag of mounts.

Use case Best first accessory Why it helps
Travel and days out Shorty or mini tripod grip Helps with selfies, group shots, time-lapses and stable clips.
Snorkelling, kayaking or pool use Floating hand grip or Floaty Helps stop the camera sinking if dropped.
Cycling and mountain biking Chest mount or handlebar mount Gives a more immersive riding point of view.
Skiing and snowboarding Chest mount, helmet mount or pole mount Keeps hands free and captures movement through the scene.
Long filming days Spare Enduro batteries and charger Reduces the risk of running out of power mid-shoot.
High-resolution video Compatible fast microSD card Prevents recording problems and gives enough storage.

Check compatibility before buying anything

GoPro accessories are not automatically compatible with every GoPro camera. Older HERO cameras, newer HERO models, MAX cameras and the latest specialist cameras may use different batteries, doors, mods, mounts or housings.

Before buying an accessory, check:

  • Your exact camera model
  • Whether the accessory fits that model
  • Whether it works with any protective case or housing you use
  • Whether it blocks charging, microphones or screens
  • Whether it is safe for the activity you plan to film

Official GoPro accessories are the safest starting point because compatibility is clearly stated. Reputable third-party accessories can also be useful, but avoid cheap mounts, batteries or waterproof housings with poor reviews, unclear compatibility or no safety information.

GoPro Travel Kit: best for holidays and everyday use

The GoPro Travel Kit is a good starting point for holidays, city breaks, family days out and casual content creation. The current kit includes Shorty, a mini extension pole and tripod, plus a Magnetic Swivel Clip, mounting buckle, thumb screw and compact case.

Shorty is useful because it solves several everyday problems. You can hold it as a small grip, extend it slightly for selfies or group shots, or stand it on a level surface for time-lapses and hands-free filming.

The Magnetic Swivel Clip is useful for clipping the camera to a backpack strap or gear, and the compact case keeps small accessories together while travelling.

Best for: travel, family holidays, vlogging, walking tours, time-lapses, group photos and casual filming.

Less useful for: high-impact sport, deep water, motorsport or activities where a more secure mount is essential.

GoPro Adventure Kit: best for water, hiking and hands-free clips

The GoPro Adventure Kit is aimed at outdoor use. It includes The Handler floating hand grip, Head Strap 2.0, a removable clip mount, thumb screw and compact case.

The Handler is especially useful around water. It gives you a steadier grip and helps the camera float if you drop it. GoPro describes The Handler as a floating hand grip with a bright orange end that pops to the surface, making it easier to spot in water.

Head Strap 2.0 is useful for hands-free point-of-view footage, but it is not the right mount for every activity. GoPro warns that the Head Strap and Clip Mount are for non-impact activities only, so do not treat it as a universal extreme-sport mount.

Best for: snorkelling, kayaking, hiking, fishing, travel clips, simple POV shots and casual outdoor use.

Less useful for: high-impact activities where a helmet, chest or specialist mount would be safer.

GoPro Sports Kit: best for cycling, skiing and action footage

The GoPro Sports Kit is designed for more active filming. It includes Chesty, the performance chest mount, plus a Handlebar/Seatpost/Pole Mount and a compact case.

A chest mount gives a more immersive point of view than holding the camera by hand. It can show your arms, handlebars, skis, board, paddle or the terrain in front of you. This makes the footage feel more natural than a camera pointed only at your face.

The Handlebar/Seatpost/Pole Mount is useful for bikes, ski poles and other round tubes. It can give a cleaner equipment-mounted angle, but it needs to be fitted securely and checked before use.

Best for: cycling, mountain biking, skiing, snowboarding, paddling and hands-free sport footage.

Less useful for: simple travel filming, family holidays or indoor use where a small grip would be easier.

Floating grips and Floaty: essential for water

If you use a GoPro near water, a floating accessory is one of the most sensible purchases. Even waterproof cameras can be lost if they sink.

A floating hand grip, such as The Handler, gives you something comfortable to hold and helps the camera float if dropped. A Floaty is a separate floating accessory designed to add buoyancy to compatible cameras.

Use floating accessories for:

  • Snorkelling
  • Kayaking
  • Paddleboarding
  • Swimming pools
  • Beach holidays
  • Boat trips

Always check depth limits before filming underwater. Some GoPro cameras are waterproof out of the box, but waterproof depth varies by model and setup. If you are diving deeper than the camera’s built-in rating, use the correct protective housing.

Spare batteries and charger: important for long days

GoPro batteries can drain quickly when recording high-resolution video, using stabilisation, filming in cold conditions, using screens, or capturing long time-lapses. A spare battery is one of the most useful accessories for almost every user.

GoPro currently sells Enduro batteries and dual chargers for different camera models, including separate options for HERO13 Black and for HERO12, HERO11 and HERO10. Do not assume batteries are interchangeable across all cameras.

For long filming days, consider:

  • Two or three compatible batteries
  • A dual battery charger
  • A USB-C power bank
  • A safe case for loose batteries
  • A charging plan for hotels, cars or campsites

Keep batteries dry, avoid leaving them in direct sun, and follow the manufacturer’s charging guidance.

Memory cards: do not buy the cheapest one

A GoPro needs a reliable microSD card to save photos and videos. High-resolution video can fail if the card is too slow, unreliable or not compatible.

For HERO13 Black, GoPro says you need a brand-name microSD, microSDHC or microSDXC card rated V30, UHS-3 or higher, with capacity up to 1TB. Other models may have different requirements, so check the guidance for your exact camera before buying.

A sensible starting point for most current GoPro users is:

  • At least one reputable 128GB or 256GB microSD card
  • V30 / UHS-3 rating or higher where required
  • A spare card for longer trips
  • A small card case to keep cards clean and safe

Do not wait until the card is full before thinking about storage. Back up footage during the trip where possible, especially if you are filming something you cannot repeat.

Mounts by activity

Activity Useful mount Shot it helps capture
Travel Shorty or small tripod grip Selfies, group shots, walking clips and time-lapses.
Snorkelling Floating hand grip Stable handheld footage above and below the water.
Cycling Chest mount or handlebar mount Immersive rider POV or bike-mounted footage.
Skiing Chest mount, helmet mount or pole mount Slope, hands, poles and movement through the scene.
Hiking Clip mount, tripod grip or head strap Walking POV, landscape shots and hands-free clips.
Vlogging Grip, tripod, light or microphone accessory More stable talking-head footage and better framing.
Motorsport Specialist secure mount Vehicle-mounted action, only where safely and legally attached.

Protective cases and waterproof housings

A protective case can help guard the camera from knocks, scratches, mud and travel damage. A waterproof housing is different: it is designed for deeper water or harsher underwater use than the camera can handle alone.

Use a protective case or housing when:

  • You are diving deeper than the camera’s built-in waterproof rating
  • The camera may hit rocks, boards, bikes or equipment
  • You are filming in mud, sand or rough conditions
  • You are packing the camera with other hard objects

Check whether the case affects audio, heat, touch controls or lens compatibility. A case that is perfect for diving may not be ideal for vlogging or long hot-weather filming.

Selfie sticks, poles and tripods

A pole or grip can improve GoPro footage because it creates distance between you and the camera. That helps with selfies, group shots, skiing clips, walking shots and travel videos.

For most users, a compact grip or mini tripod is more useful than a long selfie stick. A small tripod can sit on a wall, table, rock or beach bag for time-lapses, group photos and stable video.

Longer poles are better for skiing, snowboarding, skating and wide action shots, but they are less convenient to carry and may not be allowed in every venue or attraction.

Should you buy official GoPro accessories?

Official GoPro accessories are usually the simplest and safest option because compatibility and use cases are clear. That matters for batteries, waterproof accessories, mounts used at speed, and anything that protects the camera from loss or damage.

Third-party accessories can still be good value, especially for simple cases, tripods, clips and storage. The key is to check reviews, compatibility, materials and safety warnings. Be more cautious with batteries, waterproof housings, suction mounts and high-impact mounts.

What to avoid

  • Buying a large accessory bundle before knowing what you actually film.
  • Using cheap mounts for high-speed or high-impact activities.
  • Assuming every accessory fits every GoPro model.
  • Using a slow or unreliable microSD card for high-resolution video.
  • Taking a waterproof camera deeper than its rated limit without housing.
  • Using old batteries that no longer hold charge properly.
  • Mounting a camera where it could injure someone or distract you.

Best GoPro accessories for beginners

If you are buying your first GoPro accessories, keep it simple. Start with the items that solve the most common problems.

  1. Mini tripod grip: for travel, selfies, group shots and stable clips.
  2. Fast microSD card: for reliable video recording.
  3. Spare battery and charger: for longer filming days.
  4. Compact case: to keep the camera and mounts organised.
  5. Floating grip: if you film near water.
  6. Chest mount: if you film cycling, skiing or action sports.

Buy for your next real trip or activity, not for an imaginary future adventure. If you are going snorkelling next month, buy water accessories first. If you are filming bike rides, buy a secure cycling setup. If you mostly film family holidays, a small grip and spare battery may be enough.

Frequently asked questions

What is the most useful GoPro accessory?

For most people, the most useful first accessory is a small grip or tripod such as Shorty, plus a compatible fast microSD card and spare battery. If you film near water, a floating grip becomes essential.

Do I need a GoPro accessory kit?

A kit can be good value if you will use most of the items. The Travel Kit suits holidays and casual filming, the Adventure Kit suits water and outdoor use, and the Sports Kit suits cycling, skiing and action footage.

Can I use third-party GoPro accessories?

Yes, but choose carefully. Third-party accessories can be useful, but check compatibility, reviews and safety. Be especially cautious with batteries, waterproof housings and mounts used at speed.

Do GoPro cameras need a memory card?

Most GoPro cameras need a microSD card for photos and video. Check the requirements for your exact model. Current high-resolution models usually need a fast, reputable card rather than the cheapest option available.

What GoPro accessory do I need for snorkelling?

Use a floating hand grip or Floaty, a wrist strap and a suitable waterproof setup for your camera model. Check the camera’s depth rating before going underwater.

What GoPro accessory is best for cycling?

A chest mount gives an immersive rider view, while a handlebar or seatpost mount gives bike-mounted footage. Use secure mounts and check them before riding.

Final thoughts

The right GoPro accessory depends on the shot you want. A travel grip helps with selfies and stable clips. A floating handle protects your camera around water. A chest mount makes cycling and skiing footage feel more immersive. A spare battery and fast memory card keep the camera working when the moment happens.

Do not buy accessories just because they come in a large bundle. Think about your next trip, sport or project, then choose the mount, power and storage setup that fits that situation. A small, well-chosen kit will usually beat a drawer full of accessories you never use.

February 14, 2026 0 comments
0 FacebookTwitterPinterestEmail
Tips and Techniques

7 Tips For Starting Out In Photography

by Mark Bailey January 26, 2026
written by Mark Bailey
Starting out in photography can feel overwhelming. You may have a camera, a phone, a few ideas and hundreds of images that do not quite look the way you imagined. That is normal. Good photography is not only about owning better equipment. It is about learning how light, composition, timing and editing work together.

The best way to improve is to practise deliberately. Shoot different subjects, study your mistakes, learn the basic camera settings and build a portfolio that reflects the kind of work you want to do next.

This guide gives seven practical tips for beginner photographers, whether you want to shoot portraits, weddings, landscapes, food, family moments, travel, products or creative personal projects.

Quick answer: how do you get better at photography as a beginner?

To get better at photography, learn the basics of exposure, practise composition, shoot a wide range of subjects, edit carefully, study your best and worst images, build a focused portfolio and collaborate with other creative people. You do not need to master everything at once. Start with light, focus and framing, then build from there.

Beginner skill What to practise Why it matters
Exposure Aperture, shutter speed and ISO Controls brightness, movement and depth of field.
Composition Framing, backgrounds, leading lines and balance Makes images clearer and more intentional.
Light Window light, shade, golden hour and backlight Good light can transform an ordinary subject.
Editing Crop, exposure, colour and contrast Improves a good image without hiding poor technique.
Portfolio Select only the work you want more of Helps attract the right clients or opportunities.
Practice Different subjects and repeatable exercises Builds confidence and reveals what you enjoy shooting.

1. Learn exposure before chasing better gear

Exposure is the brightness of your photograph, but it also affects how the image feels. Three settings control it: aperture, shutter speed and ISO. Adobe’s beginner photography guidance describes these as the exposure triangle, and Nikon also explains that these three controls work together to shape the final image.

  • Aperture controls how much light enters the lens and how blurred the background looks.
  • Shutter speed controls how long the camera records light and whether movement freezes or blurs.
  • ISO controls how sensitive the camera is to light, but higher ISO can add noise or grain.

You do not need to shoot fully manual on day one. Start in Auto if you need to, then try Aperture Priority for portraits and background blur, or Shutter Priority for sport, children, pets and movement. Nikon’s camera-mode guidance explains that Aperture Priority lets you choose aperture while the camera selects shutter speed, and Shutter Priority lets you choose shutter speed while the camera selects aperture.

2. Practise composition every time you shoot

Composition is how you arrange everything inside the frame. A technically sharp photo can still feel weak if the subject is lost, the background is messy or the horizon is tilted.

Before pressing the shutter, ask three questions:

  • What is the subject?
  • What is distracting from it?
  • Can I improve the photo by moving closer, stepping sideways or changing height?

Use simple composition habits first. Keep horizons straight. Watch the edges of the frame. Avoid cutting through heads with background lines. Leave space in front of a person or animal looking sideways. Use doorways, paths, fences, windows and shadows to lead the eye.

The more you practise composition, the less you need to rely on cropping later.

3. Shoot different subjects at first

When you are new to photography, it is worth trying many subjects before choosing a niche. Photograph people, pets, food, buildings, landscapes, products, events, street scenes, details, interiors and everyday family life.

This does two useful things. First, it helps you discover what you enjoy. You may think you want to shoot weddings, then realise you prefer food, interiors or documentary family photography. Second, different subjects teach different skills.

Subject What it teaches
Portraits Light, connection, posing and background control.
Food Composition, colour, texture and natural light.
Landscapes Timing, weather, depth and clean framing.
Sport and pets Shutter speed, anticipation and movement.
Architecture Lines, symmetry, distortion and perspective.
Products Detail, reflections, surfaces and controlled lighting.

Do not worry if your early portfolio looks mixed. That is part of learning. Later, you can narrow it down.

4. Edit your photos, but do not hide behind editing

Editing is part of modern photography. It can improve exposure, colour, contrast, cropping and distractions. It can also ruin an image if you push it too far.

For beginners, a simple editing order works well:

  1. Straighten the image.
  2. Crop out distractions.
  3. Adjust exposure.
  4. Reduce harsh highlights.
  5. Lift shadows only where needed.
  6. Correct white balance if the colour looks too yellow or too blue.
  7. Add a small amount of contrast or sharpness.

Avoid using editing to rescue every weak shot. If a photo is badly focused, poorly timed or taken in terrible light, editing can only do so much. Keep a few unedited or lightly edited images in your portfolio too, especially if clients need to understand your natural style.

5. Build a portfolio around what you want to shoot

Your portfolio should not show everything you have ever photographed. It should show the work you want more of.

If you want to photograph families outdoors, do not fill your homepage with studio product shots. If you want weddings, show couples, emotion, details, speeches, venues and natural moments. If you dislike a type of work, do not make it the centre of your portfolio just because the images are technically good.

A beginner portfolio can be small. Ten strong images are better than fifty average ones. Choose photographs that are clear, consistent and relevant to the client or audience you want to attract.

6. Use travel and ordinary places as practice

You do not need exotic locations to practise photography. A local high street, park, beach, café, train station, market or family walk can teach you just as much as a major trip.

When you do travel, create a complete visual story rather than only taking obvious postcard shots. Include wide scenes, details, people, food, signs, textures, weather, quiet moments and anything that gives the place character.

A simple travel practice list might include:

  • One wide establishing shot
  • One close-up detail
  • One portrait or candid human moment
  • One food or drink image
  • One image showing movement
  • One image taken in difficult light
  • One image that captures the mood of the place

Remove unrelated travel links from this section. A coach-hire link does not naturally help someone learn photography and can make the article look like it exists mainly to place links.

7. Collaborate and ask for useful feedback

Photography improves faster when you work with other people. Collaborate with photographers, models, stylists, makeup artists, small businesses, families, musicians, food creators or local events. You will learn how to communicate, plan a shoot, solve problems and respond when conditions are not perfect.

Ask for specific feedback rather than general praise. Instead of asking “Do you like this?”, ask:

  • Is the subject clear?
  • Is the background distracting?
  • Does the light suit the mood?
  • Is the crop too tight or too loose?
  • Which image from this set is strongest?
  • What should I try differently next time?

Be careful whose feedback you follow. A working photographer, tutor or experienced editor can often give more useful advice than a social media comment from someone who simply likes bright colours or heavy filters.

Bonus tip: protect and organise your kit

Once you start travelling with cameras, lenses, batteries, cards and chargers, organisation matters. Keep memory cards in a case, charge batteries before shoots, back up your files and protect gear from rain, dust and knocks.

Beginner photography practice plan

Use this seven-day plan if you want a simple way to start practising.

Day Exercise Goal
Day 1 Photograph one object beside a window from five angles. Learn how light and position change the image.
Day 2 Take ten portraits in open shade. Practise flattering natural light.
Day 3 Photograph moving subjects with different shutter speeds. Understand blur and frozen action.
Day 4 Create a five-photo story of your local area. Think like an editor, not just a camera owner.
Day 5 Shoot one scene at different apertures. See how background blur and depth of field change.
Day 6 Edit three photos lightly and compare before and after. Learn restraint in editing.
Day 7 Choose your best five images and explain why they work. Build judgement and portfolio discipline.

Common beginner photography mistakes

  • Buying gear before learning light: better equipment cannot fix every weak photo.
  • Standing in one place: move closer, lower, higher or sideways before taking the shot.
  • Ignoring the background: clutter can ruin an otherwise good subject.
  • Over-editing: too much saturation, clarity or smoothing makes photos look artificial.
  • Showing everything: a strong portfolio is edited down, not filled up.
  • Not backing up files: keep copies of important images in more than one place.
  • Using unlicensed images online: only publish photos you own, commissioned, licensed or have permission to use.

Frequently asked questions

What should a beginner photographer learn first?

Start with light, focus and composition. Then learn how aperture, shutter speed and ISO work together. You do not need to master manual mode immediately.

Should beginners use Auto mode?

Yes. Auto mode is fine while you are learning. Move gradually into Aperture Priority, Shutter Priority and Manual mode when you understand what you want to control.

How often should I practise photography?

Short, regular practice is better than waiting for perfect conditions. Even 20 minutes with one subject can teach you something useful if you shoot deliberately.

Do I need Photoshop to be a good photographer?

No. Editing helps, but good photography starts with light, timing, focus and composition. Learn to make a strong image in camera, then use editing to refine it.

What should I put in my first photography portfolio?

Choose a small set of your strongest images that reflect the work you want to shoot next. Do not include every genre unless you genuinely want to offer every genre.

How do I get better feedback on my photos?

Ask specific questions about light, composition, focus, colour, crop and story. General praise is nice, but specific critique helps you improve.

Final thoughts

Photography improves through repetition, attention and honest editing. Learn the exposure basics, practise composition, shoot different subjects, collaborate with people and build a portfolio that points towards the work you want.

You do not need to become a professional overnight. Start by making one better photograph than you made last week. Then repeat that process until your eye, confidence and style begin to develop.

January 26, 2026 0 comments
0 FacebookTwitterPinterestEmail
Tips and Techniques

Black Friday 2018: Product Photography Tips to Boost your Conversions

by Mark Bailey October 22, 2018
written by Mark Bailey

Black Friday has always been known as one of the biggest holiday sales in the market. Many people anticipate it every year, even enduring waiting in line to their favourite shop’s entrance. Which is why online stores are making extra preparations for it – uploading promo ads, stocking new items, and posting new photos of their products.

Photos have the potential to turn your casual site browsers into customers. The better the size and quality of your store photos, the more customers it can attract to buying your products. This just shows how powerful photos are in the online market. Presenting your product through photos makes all the difference.

If you want to learn about product photography, keep reading! You just might be surprised by the tips and ideas you can gain, be it lighting or apps you can use for your shoot.

Show another side of your product

Having said that better quality of your product photos attracts more customers, it is always important to present your product in the best light possible. This means highlighting the good content of your products.

Showing emotion through your photos can help boost the sales of the product. For example, how a person looks with the use of your product. Does it create an ambience of confidence? Would it make the user’s experience look more accessible or more convenient?

Additionally, when creating a feel for the product, this also involves putting the product in a suitable environment. Showcasing the product in situations that it can showcase the worth of the customer’s money can greatly appeal to the buyer.

Lastly and most importantly, letting the customer see the product in full detail can help them have a concrete idea of what they are buying. It makes the customer trust the retailer if they are allowed full disclosure of all the product parts. You can also get creative in presenting your product by using different lighting techniques or showing different angles.

Remember that product photos are an investment

Having high-quality images of your product should be the best investment you have for your online market. You can employ a photographer to get the job done, or you can opt to the cheaper way by doing it yourself with this simple product photography guide. Either way, you are sure to invest time and skills for the job, and it will all be worth it when you see its effect on your buyers.

You don’t need an uber-expensive camera

There is no need to buy a high-end camera for product photography. You can opt to ask your friend to lend you their high-end camera, or you can buy one yourself.  There are a lot of camera options in the market that can get you the quality of the photos you want without breaking the bank. You can use your mobile phone since you only need image quality that does not blur or distort the product. Newly released smartphones can also control the exposure and brightness of the product environment.

Post your product on social media

Social media is a significant avenue to present your product. You can post your product in social media to reach a wider audience and gain more publicity. With this, you need to post photos that would engage the audience into seeing more about your products. However, posting on social media is a lot different from posting pictures on your product website. You need to adhere to certain image dimensions to maximize the posting. This social media cheat sheet can guide you in posting the right size of your product image on social media.

Offer a sneak peek for your customers

Since Black Friday is one of the biggest holidays when products have price markdowns and cuts, you can opt to offer a sneak peek of the deals you have for your products. This means putting out teasers on what your customers can anticipate on your Black Friday Sale. Make them excited, and be sure to let them know when the sale starts.

Keep an Eye on Image Files Sizes

Make sure that the files sizes of your images are compatible with your website. There will be a constant connection between the load time of the page, and the image quality that is being loaded. You need to observe and maintain the standard load time to determine if you need a lower image file size of the product photos. Page load time can greatly affect the customers’ willingness to buy your products. It should always be convenient for them to browse it whether they are on a laptop or surfing through their mobile phones.

Don’t be afraid of editing

Making sure your photos are consistent with the colours they express is crucial to your branding which is why photo editing is highly encouraged. If you want to make sure your photos present the cohesion you need for your brand, then be sure to correct them by using photo editing software. You can also match the tone of your product collection with the season.

Be consistent with your theme

Throughout the whole article, it has always been a point to create a consistent image of your brand. It is important enough to make it a tip on its own.

Whatever you may be doing in the image of your brand — whether it be tweeting, posting details, or messaging a customer, it should always be done align with your branding. Especially on the website, having a consistent feel to your customers is necessary so that your brand is established with them. If you are a skincare company that uses neutral colours with pastel undertones, you cannot use images that are high in contrast.

Conclusion

Make sure you’re ready for the big day. Black Friday is just around the corner and many of your customers will be watching out for your newest promos, and next big product collection. What better way to do that than by applying those tips? Product photography will always be a crucial factor in gaining conversions since it makes all the difference when the customer is able to trust your brand. By building your brand image through your photos, it can guarantee you that customers will surely trust the quality and service of the brand.

If you want to explore what other options you can boost your website sales, this e-commerce conversion guide can help you further in improving your conversion e-commerce conversion rate.

October 22, 2018 0 comments
0 FacebookTwitterPinterestEmail
Tips and Techniques

How to live stream a wedding ceremony?

by Mark Bailey October 18, 2018
written by Mark Bailey

It is your special day. You are going to tie a knot with someone who will always stay by your side. You want to remember this day as something more than just an ancient tradition. You want to do everything to make this day memorable for you and your better half. You might also consider a destination wedding on a far-flung location to jazz up the event.

However, life is unpredictable and so are its circumstances. There could be uncountable situations when some of your close inner circles might miss the wedding in person. Appreciate the technology, because there are many ways using which you can have your near ones by your side even if they are not present in person. Live streaming is one of them and probably the most accessible of all.

Why would you want to live stream your wedding?

With what that was available to offer, technology has always left a mark in the wedding ceremonies from time to time. Be it wedding photography, photo booths, Pre-marriage shoot, drone videography, there has always been something special available for the weddings. Live streaming a wedding is the new trend. It has made to the context because of the real-time coverage and broadcasting of the events, offering much more than a traditional wedding video shoot.

  • It comes as a boon when someone from your family or inner circle falls ill and cannot travel to your wedding destination, or cannot afford to attend in person because of any random reason.
  • It entices millions of people when public figures, celebrities, social media influencers, sports stars or politicians, share their special moment with their followers in the real-time.
  • You may want to share your moment with your marine brother, who is currently on a post and cannot come for the wedding.
  • The ability to share this moment with your loved ones adds the personal and emotional touch to the tech and this is what that makes it so special.

How to live stream your wedding?

You can implement the live streaming of your wedding in the two possible ways: Hire the professional services or Do it by yourself.

Hiring professionals:

Once you are certain about your decision to live stream your wedding event, hire a video streaming service that would take care of everything. They would have professionals who can manage the setup, required equipment, and everything else for the live event. There are services who offer a one-stop solution for the whole requirements. They would prepare a professional grade set up covering everything from best camera positions to expert camerapersons.

They possess the best tech for-

  • HD video quality of the live streaming
  • No or lower latency in the broadcast
  • High-quality audio feed
  • Multiple cameras covering everything in real-time.

Doing it yourself:

If you want to DIY, you have many options to choose from. Depending on your requirement and privacy of the live stream, you can go for any of the following methods:

Social media streaming

The cheapest and most accessible way to live stream your wedding is to choose the social media applications as medium. You can utilize the live streaming features of Facebook Live, Instagram Live, YouTube Live, Periscope, Twitch or Snapchat. The mobile applications of all these platforms offer the facility to go live in just a few clicks.

The social media route is suitable for –

Streamers who can manage with the average video quality. Due to high latency and internet traffic, social media platforms generally produce average to poor video quality. We would recommend using them as the last alternative if you cannot manage to get a superior solution.

In addition, use social media, when you are streaming for a personal access, not like celebs who stream for at least millions of followers.

PS: If you decide to use social media alone and not the next option listed below, then go for Periscope, as it can live stream the feeds directly from your Go-Pro camera. It would produce a comparatively better quality of the stream.

Dedicated live streaming solutions

There is an alternate solution to the social media streaming- a dedicated live streaming solution. Undoubtedly, social media live streaming is free and instant, but it is also true that these platforms do a lot more than just live streaming. Due to that, there is always congestion, ultimately affecting the quality of the stream, even with the high-speed internet. Moreover-

  • You cannot do a peer to peer streaming, in case you do not want to make your stream public.
  • You will not possess the right; the video becomes an intellectual property of the platform.
  • You will not have a control over stream quality; it’s totally network dependent.
  • Tech support is not up to the mark for a free service.

Therefore, if you think that social media streaming is not adequate for streaming a valuable moment like wedding ceremony, you can go for a professional-grade solution to avoid all the above drawbacks and offer the best quality stream to your loved ones. You can use any of the professional-grade live streaming software like DaCast or StreamHash to get the following benefits:

  • White label service- where the video will be your own property and no one else can claim it.
  • Complete privacy of the stream, as you can make your stream private and allow only selected people to watch it.
  • They provide 24X7-tech support for installation and operation of the software.
  • As they are dedicated, they produce negligible or no latency at all in the live stream.
  • You can enjoy HD quality streaming with clear audio via top-tier Content Delivery Network.

Whether you are streaming for a single person or a group of followers, you would not want to ruin the experience with the poor quality of the stream. There is always an emotional attachment with the events like a wedding. You can best serve these emotions by streaming in the finest video qualities using the handpicked solutions explained in this article. So focus on creating an impression and make the wedding memorable for everyone, even for those who could not attend it physically.

October 18, 2018 0 comments
1 FacebookTwitterPinterestEmail
Tips and Techniques

The 5 best DSLRs for video production

by Mark Bailey November 15, 2017
written by Mark Bailey

Over the course of the last decade DSLR cameras have made major inroads in the dominance of shoulder mounted or mobile camcorders for video production. DSLRs offer a number of advantages over camcorders, including full size sensors and the ability to use longer lenses made for stills photography.

For a long time Canon sat pretty on the top of the video DSLR pile with the 5D, the darling of film makers everywhere. More recently the other camera makers have caught up to a great extent, this article will examine seven of the best DSLR cameras for video.

Canon 5D mark iii

Firstly what for a long time was the preeminent video DSLR, now in its third incarnation. The camera is favoured for its ability to shoot in low level light, it’s 41 cross-type autofocus and general fantastic image quality. There are various other Canon DSLRs available of course, but the 5D leaves it’s stablemates standing as far as quality is concerned.

The main downside is the fact that the camera itself is showing its age a bit, having been released in 2012. It lacks some modern features like 4k and a flip out screen.

Panasonic Lumix GH4

The pretender to the 5D throne is the Lumix, which has increasingly become the DSLR of choice for video production companies over the last five years. A large part of this is because the Lumix is a mirrorless micro four thirds camera that shoots 4k at 24 and 30 fps.

Another big benefit is that the Lumix is unusual in that it can shoot videos longer than 29 minutes, 59 seconds. The Lumix is also very competitively priced compared to the Canon and is significantly lighter and smaller.

Sony Alpha a75 II

Strictly speaking not a DSLR, the Alpha is a mirrorless camera which provides incredible images at a more premium price. It has a full frame sensor and 169 autofocus points as well as 4k capabilities. One of the biggest benefits is the fact that the Alpha is mirrorless so is very light and small compared to other full frame cameras.

Low light capabilities are another big plus for the Alpha. This along with build in stabilisation and its compactness make this camera a real contender.

Nikon D810

This Nikon has been a strong contender for the 5D’s crown for quite a while, it has similar specs to the Canon. These include 1080p /60fps video, 36 MP full frame sensor 51 autofocus points. It also includes an updated sensor with an expanded native ISO range and great features including time lapse and a strong LCD screen. The price is also very competitive.

Canon 80D

Back in the reasonably priced end of the market is the Canon 80D. This camera is very popular for vloggers and the more entry level end of the video production market. The crop sensor does full HD at 60fps and has good, accurate autofocus. The 80D is really good for the Youtube crowd who don’t want to pony up a fortune for a 5D or a Sony Alpha. It’s excellent at most things as long as you don’t want 4k or full sensor action.


November 15, 2017 0 comments
0 FacebookTwitterPinterestEmail
Tips and Techniques

How To Capture The Best Property Photography

by Mark Bailey June 29, 2017
written by Mark Bailey

Property photography goes beyond point-and-shoot actions. Proper care and planning goes into other photography niches. The property niche is not different. Your shots are supposed to impress your target audience by highlighting all the underlying attraction elements. Here are some top tips on how you can capture the best property photography.

Use the Right Equipment

To get the best results with your property photography, you need to have the basics in place. Most of top real estate photographers that supply magnificent images to top property websites, such as Spot Blue, will swear by these.

Wide-angle lens: Some of the best you can find in the market for general cropped frame shots are Nikon’s 10-24mm and Canon’s 10-22mm or 10-18mm. On the full-frame front, the Canon 17-40mm, Nikon 16-35mm lenses and Nikon 14-24mm are great options. Don’t want to shell out on those? Look for equivalents from Tamron and Sigma. These lenses allow powerful zoom out to capture large spaces without any unrealistic distortions.

Tripod: You can’t hold your camera by hand with serious interior photography. The results will look unprofessional. A tripod combined with a remote shutter eliminates the possibility of shakes during shoots.

Flash: Your camera’s standard flash is for leisurely shots. Experts invest in high quality flash to deliver truly robust shots.

Keep Flash and Ambient Light under Control

The lighting inside a room can be more than seven times darker than the outdoors even during the daytime. To get quality shots, you need to properly balance light coming in and light inside the room. You need to first of all understand how your camera’s shutter speeds affects the ambient light and how the ISO affect ambient and flash power.

Clear the Space

If there is a wide range of clutter around the property, your images will look unprofessional. Clear all clutter, arrange sofas, straighten beddings and turn on the lights for an invitingly warm shot. If there are locked doors that block light sources then get them unlocked, even if it means calling a reliable local locksmith!

Effective Composition is Vital

What are the best view points for your shot? Walk around the room to find them. In many cases, however, the best points are from corners of the room or positions that communicate the space or flow from one room to another. Take several shots from several viewpoints so you can review your images later and make more informed decisions on the perspective that works best.

Understand Your Settings

Taking your shots with ISO set on Auto will yield subpar shots. Keep it on 100 or 200 if you need shots that are devoid or noise or grain. You consider increasing your ISO from these levels if you need more power to illuminate the space. Your aperture should be set at f/8 as well for two main reasons. Firstly, that setting is the sharpest for your lens and secondly, the depth offered is wide enough to make the entire room the focus while allowing enough light for short shutter speeds.

These tips are bound to transform your property photography. Get practicing today!

June 29, 2017 0 comments
0 FacebookTwitterPinterestEmail
  • 1
  • 2
  • 3
banner

Categories

  • Advice (36)
  • Brands (13)
  • Camera Bag (10)
  • Featured (13)
  • Features (1)
  • Marketing (14)
  • Online (6)
  • Photography Showcase (7)
  • Reviews (12)
  • Roundups (4)
  • Showcase (8)
  • Tips and Techniques (21)
  • Trends (14)
  • Uncategorized (1)

About Us

DC Mag is packed with expert advice, inspirational images, digital photography tips and techniques, photo editing lessons and video tutorials. This includes reviews, digital camera best buys, buying advice, news and more...

Editors Picks

  • 1

    The Most Influential Thought Leaders in the Digital Marketing Industry

    February 13, 2016
  • 2

    Unleash Your Digital Business

    February 13, 2016

Keep in touch

Facebook Twitter Pinterest Tumblr Youtube

@2022 - Dcmag. All Right Reserved.


Back To Top
DC Mag
  • Home
  • Advice
    • Photography Showcase
    • Tips and Techniques
  • Brands
  • Reviews
  • Roundups
  • Trends
  • Camera Bag
  • Marketing
  • Online
  • Contact Us